
Guitar videos are big business on YouTube. Whether you are looking to post cover versions, your own compositions or even tutorials or other guitar-related videos, it is important to create something professional to stand out from the crowd.
Everyone has slightly different ambitions when it comes to their guitar-based YouTube channel, but the one thing we all have in common is the fact we want people to pay attention! In order to give yourself the best chance of making this happen, professional videos made with quality equipment will be key.
Done right, YouTube guitar videos can enhance your career and even make you an income. Top YouTubers can be paid handsomely in a cut of ad revenue. Whether this is your aim or not, when you’re putting your face out there it is best to look like you know what you’re doing.
Fortunately, the equipment we’ve picked out and recommended in this article is all relatively straightforward to use. You don’t need to go to college and study editing to make something that looks like you know what you’re doing. So, what equipment do we recommend to make your pro looking YouTube videos?
Audio
Microphone For Acoustic Guitar
Your microphone is probably the single most important piece of equipment when it comes to making guitar videos. Your video itself could look like a Hollywood movie, but if the sound quality is poor then people are going to quickly click away and look for another video.
Too many guitarists who start making videos make the mistake of thinking that the inbuilt microphone on their camera is going to be good enough. This camera is really not going to have the same level of quality. It is made to be small and fit inside the camera itself, and though it might be fine for home videos it really isn’t intended to be used for professional audio applications. Remember, you’re targeting musicians and audiophiles who will probably notice if it sounds like it’s been made on an 80s home video camera.
Even if you’ve read the reviews of your chosen camera and it says that the microphone is great quality (some cameras do have excellent mics), it doesn’t mean it is suitable for these types of videos. Onboard camera mics are designed to pick up sound from all around, and don’t allow you to specifically point to your guitar or amp to pick up the audio you need. Instead, you will be far more likely to end up with background noise.
Instead, you should treat the audio recording and video recording as separate things. You will be able to sync the two after you’ve recorded, so you don’t need to worry about the sound being stored on the SD card along with the video.
Your choices for a microphone for making guitar videos will boil down to dynamic, condenser and possibly even USB styles of mic.
We break down the three types of microphone you can use, starting with the best recommendation:
Best – Dynamic Microphone – Shure SM57
Dynamic microphones are often used in live music scenarios and are versatile and extremely hard-wearing. Drop a well-built dynamic mic and it is very unlikely that it will break and stop recording the audio you need it to. They aren’t quite as sensitive as some of the condenser microphones on the market, but will be adequate for professional sound.
SM57 by Shure is our recommended dynamic microphone, and with good reason. This mic has a long history of being used in both studio and live sound environments and has become known as one of the best and most rugged instrument microphones in the world. It’s frequency response (the frequencies it is most suited to picking up) suits guitars brilliantly and is also decent for the human voice if you plan to do some talking through your videos, too.
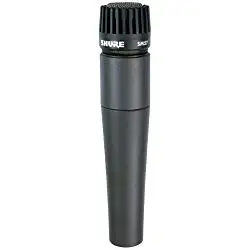
The SM57 comes at a very modest price when you consider how much it has to offer, check the price at Amazon here. This is a tool that is found in the arsenal of music producers all around the world, and makes a really solid and natural choice for making pro guitar videos.
The SM57 is equally adept at recording acoustic guitar when positioned towards the soundhole, or it can record electric guitar by being pointed at the amplifier.
Very Good – Condenser Mic – Audio-Technica AT2020 (Analog)
This is a cardioid condenser microphone which is available at a similar price to the SM57. Condenser microphones can be more sensitive and pick up more detail than dynamic microphones, and the AT2020 (check the price at Amazon here) is renowned for being great quality to record both vocals and instruments.
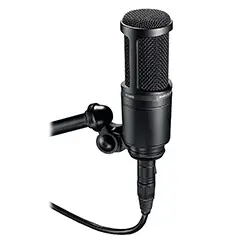
The cardioid pickup pattern means that noise from sources further away will be rejected, which can mean a very good choice if you have to record your guitar videos in a location which is not silent and where there is a chance of other sounds getting picked up.
Condenser mics come with their downsides too, they’re more sensitive if dropped and the mechanism which is inside picking up the sound can become damaged more easily. Also, condenser mics such as this one need phantom power, meaning you’ll have to use an audio interface or mixer which can provide power to the mic in order for it to work. This is a ‘side-address’ microphone so pointing the longer side at the guitar or amplifier is what you will need to do in order to pick up the sound.
The AT2020 also comes in USB format but you will only be recording in 16 bit resolution where as with the analog version you will have 24 bit. This means that you will have greater control over sound levels in post production and not have to worry as much about recording levels. In short, less time faffing around and more time playing.
All-in-all, it is a great quality mic when you consider the price point, but you don’t have to get a condenser for recording pro guitar videos and a dynamic mic such as the SM57 will be more than enough quality.
Good – USB Microphone
USB Microphones – Yes or No?
To use either of the two microphones above, you will need to twin them with a mixing desk or audio interface (more on this later). A standard, old-style microphone cannot automatically plug into your laptop and start picking up audio. This is why, for the sake of convenience, many brands have introduced USB microphones as a way to bypass this need for an extra piece of equipment. Just plug it into the computer and you are ready to go.
USB mics are the subject of some debate. When the technology first came out there is little denying that it was lacking in quality, but time has passed and there are some decent USB microphones out there.
Though a USB mic may sacrifice some quality compared to the other types, it is possible to make a good quality video for YouTube where the audio is recorded on a USB microphone if you choose the right model.
Recommended USB Mic – Blue Yeti
The Blue brand of microphones has become synonymous with USB mic technology, they have some iconic models and the Blue Yeti has become associated with YouTubers, streamers and gamers who want to record audio to go with their videos. This is usually a huge upgrade on the inbuilt camera microphones many people start off using.
The Blue Yeti (check the price here at Amazon)markets itself as ‘the mic of the internet’. The features are certainly good enough for most internet uses such as streaming, and used correctly this can give a professional sound for your videos.
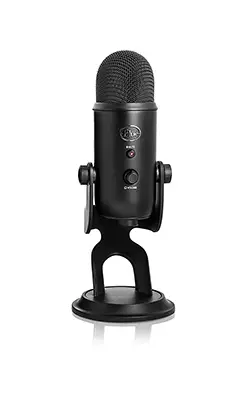
Features include three different recording capsules so you can choose to suit the situation. You can record cardioid, omni, bidirectional and even stereo. Gain control lets you alter the pickup for how loud the guitar is, and you can even monitor live through the headphone output built into the mic.
Some people do find USB mics limiting, but if you are looking for a hassle-free, plug and play option then the Blue Yeti could be well worth considering. Just bare in mind, for less money you can buy a Shure SM57.
Editors note: I (Luke) use a Blue Yeti on my Guitar Journey videos, it works pretty well and you can use it as an external mic on your DSLR also. If you already have one then use it (that was my situation) otherwise I would buy the Shure SM57 if I was starting from scratch or had the money to spend right now.
Audio Interface For Electric Guitar
An audio interface can be useful in two ways. It can either allow you to plug in a condenser or dynamic microphone, providing phantom power or boosting the signal to a level where your computer can record it via software. Alternatively, it can be used to record directly from an electric guitar or an acoustic guitar with a pickup (electro-acoustic).
The Focusrite Scarlett Solo is arguably the most popular in the world for this, and with good reason. It lets you plug in a microphone, a guitar, or even both if you plan to do a combination of guitar plus talking or singing. The Scarlett Solo doesn’t cost an excessive amount (check the price here at Amazon) and can simply ‘plug and play’. Your software should recognize it very quickly after it has been plugged into your computer via USB and you’ll be ready to go.
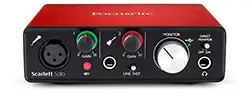
This is the way around using mixing desks and other expensive and difficult equipment. There are cheaper audio interfaces on the market but these simply don’t have the same build quality and durability as the Focusrite.
These audio interfaces can be found in home studios all around the world and are highly rated in many reviews. If you plan to do some audio recording as well as making guitar videos for YouTube then they can come in very handy.
DAW
The “DAW” or “Digital Audio Workstation” is the center for your recording and production on your computer. This is the software that will be driving everything. It is where you will tell your computer which mic to use, set up recordings and make edits. Think of this as an audio editing suite.
A DAW may be a concept you’re already familiar with if you’ve ever tried anything musical on your computer. Apple computers come with “Garage Band” built in, and this can be an option for recording the audio for your videos. These DAWs are what is used for beat-making and music production, too, if you have any interest in electronic music or home recording.
So which DAWs should you use? There are a few options. Professionals will often opt for Logic or Pro Tools. These are two powerful pieces of a kit, but for recording and editing audio for some simple YouTube videos, they are overkill.
Instead, go for something easier on the wallet and simpler to get to grips with. The three options we recommend are:
Garageband – FREE – iOS – If you already have it, you can use Garageband and see if it works for you. If you are an avid Apple user, the interface may well come to you quite naturally. Also, they have different product templates, one of which is for recording audio rather than producing or playing virtual instruments. This simplifies things when just looking to record audio.
Audacity – FREE – iOS & Windows – A lot of budding YouTubes and home recording enthusiasts start out with Audacity. This free software is basic, but it lets you lay down your audio and edit it to an extent where it is ready to be put into video editing software sounding pretty clean cut.
Reaper – $60 to $299 – iOS & Windows – For software which can be used on either Windows or OSX, Reaper, made by Cockos, is very popular. It is surprisingly powerful and the cost is relatively low. You can use it for free for 60 days on an ‘evaluation license’ which allows you to see if this is the software for you. Then, the cost is just $60 for a license. Within the software you can record and edit with ease, and Reaper also has some very good compatibility with other plugins. On top of this, it has really good video editing capabilities! You can import video straight into reaper and do some basic editing without ever having to use video editing software.
Your DAW is important. Fortunately, there is lots of content out there to help you to learn how to use software. Reaper, for instance, has a great community of people making videos and even a forum to help you to get to grips with the DAW. The main thing is that you are comfortable using it to edit.
VST Plugins
If you use an audio interface then you will not need an amplifier or effects pedals. You can use VST Plugins instead. So for example, maybe you want to add distortion to your guitar sound, there is a plugin for that.
VST Plugins work with your DAW in order to allow you to do more with your sound. This is much like the effects pedals you may be used to using with your guitar. These can add things like reverb, or can just provide further editing abilities for your video. Some plugins which can be very useful include:
- Amp Simulators – These will take a raw audio signal from a guitar and apply the same sort of sound an amplifier would create. Software like Guitar Rig is wonderful for this, and gives you access to hundreds of amps and effects.
- EQ – An EQ allows you to cut or boost frequencies to tailor the sound. For instance, if you want to reduce the bass frequencies you can do so with an EQ.
- Compression – A compressor brings quieter sounds and louder sounds closer together in volume. For instance, if your guitar strumming is inconsistent, it can make it sound at a more even level.
There are hundreds of VST Plugins available and many are free. There are amp simulators out there for virtually any type of amp you can think of as well as effects pedals.
My favorite VST Plugin by far is BIAS FX by Positive Grid (check prices here at Sweetwater). It a great option and gives you access to hundreds of guitar amplifier sounds and effects so there is something for everyone.
Bias FX acts as an all-in-one solution for guitar tones. You are able to simulate an entire rig that could cost in the tens of thousands for a fraction of the price (the standard Biax FS version is currently $49 at Sweetwater). It truly represents excellent value for money so you should definitely check it out.
Video
While the audio quality is high in priority when making a professional guitar video, it doesn’t mean video can be neglected. In the modern age, there is really no excuse for poor quality video. It is simpler than ever to make high-quality videos with high production values without having to spend a huge amount of money.
Electronics have become cheaper, and a DSLR camera (the sort that many professional videos are now made on) have video capabilities and also are aimed at more everyday consumers than just being for video and photography professionals. In fact, the cameras most of us have on our smartphones are better quality than we could have imagined being in our homes 10 or 20 years ago.
Using Phones
While we still recommend using a DSLR if at all possible, or even a professional video camera, phones are available to most of us. If you’re just getting started, your iPhone, Samsung or other phones can be a brilliant way to get high quality video.
Many big players in Hollywood, including Steven Soderbergh, have experimented with the capabilities of modern phones when it comes to film. Some movies have even been shot entirely on iPhones. This is proof that they are not just useful due to the fact that they are convenient, but also that they can provide useable footage.
Many phones are now equipped with 4k HD video capabilities. This is very high quality, but you need to know what you are doing with the equipment if you are going to make the most out of your phone’s video capabilities. Also, keep in mind the fact that this video can take up a huge amount of storage space. If you are planning to make long videos, you may have to do so in multiple takes, especially if your phone doesn’t have huge storage or the capacity to expand the memory.
If you decide to use your phone, the important things to remember, and the way you should approach using your smartphone for video, have been explored in the list below.
- Expand your storage as much as you possibly can with micro SD cards. To record good quality video footage then you will need as much memory as possible.
- Check the video recording settings on your phone. The default setting may not be the best quality setting available for you to record in, so you could be losing quality by not checking settings such as resolution and FPS.
- Consider getting cloud storage so that you can upload your video straight to the cloud once you’ve finished recording. You can also use this to download and edit the videos on your computer.
- Use a tripod. There are plenty of tripods out there which can be suitable for phones, you may just need an adapter (like this universal one for under $20) to make it fit properly. Nothing says ‘unprofessional’ like handheld camera work. Remember, you’re making guitar videos, not the sequel to the Blair Witch Project!
- Ensure the lighting is right. We have a full section on lighting below. It is always vital to get the lighting correct when shooting a video, but this is especially true with phone cameras. They have small sensors which means they struggle to let in as much light as some of the camera lenses which come with DSLRs.
- Use natural light, and the great outdoors, if it makes sense. If it isn’t windy and won’t compromise the audio quality then there is every reason to shoot your video outdoors as this will mean more light.
DSLR
Canon M50
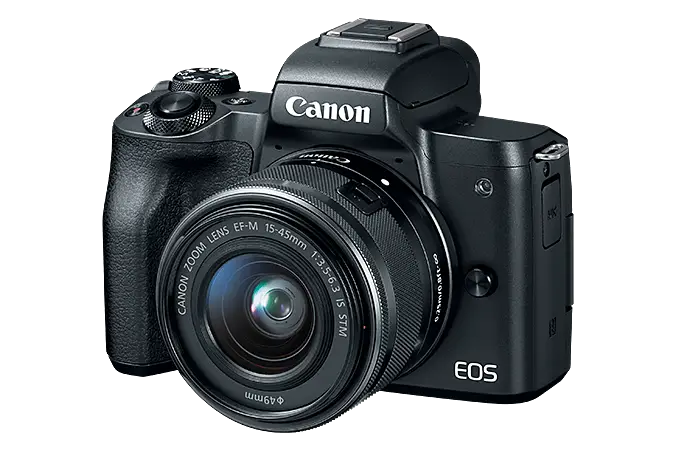
Canon’s M50 is its entry level mirror less 4K DSLR it is designed with YouTube content creators is mind, so has excellent video capabilities, is lightweight, small and an excellent choice. The benefits of having a model such as this, with such a powerful video mode, can mean your videos look truly professional. Click here to check the price of the Canon M50 at Amazon.
The M50 has interchangeable lenses, but straight out of the box the kit lens will see you good to go. You can shoot in Full HD 1080p Video which can be recorded at the standard 30 fps or 4K. This means that you won’t be let down by the quality of the camera.
The autofocus on Canon cameras at this price point is second to none which means that you can leave this running even if you are in the room alone and it should capture every move without going out of focus and leaving you blurry.
Sometimes, these cameras are sold just as the ‘body’, so not with a lens fitted to them. However, the best way to buy a Canon M50 if you are just starting is part of a bundle which many retailers sell. This will mean it comes with a lens (usually the 18-55mm “kit” lens) and other accessories such as tripods, bags, SD cards. It can be a good way to save money in the long run on your camera equipment.
For a decent kit including the M50 camera you will probably just under $700 (like this one at Amazon) but this can be a sound investment when you think of the capabilities it has. The fact this allows you 4K and full HD video, the option to change lens, optical zooming and more means that it should serve you well for many years to come.
Cheaper Video Cameras – A Realistic Option?
To be honest, if you are going to go for a significantly cheaper video camera, and one without the option to change lenses, you may just be better off shooting on your phone. If your phone isn’t that modern (hasn’t been released in the last few years) then see if you can use a friends or family members. They may be willing to help you out. That said, shooting with a second camera angle can be a good thing to do, especially when it comes to editing and keeping your videos interesting.
Tripods

A true golden rule of shooting guitar videos for YouTube. Tripods are not optional. The one above is under $30 at Amazon, click here to check the price.
As we’ve already briefly mentioned, using a handheld option will make your video look unprofessional and unplanned. Even if you have the best equipment possible, shaky camera work can undo all of your good work.
Luckily, a Tripod is one of the things that you can buy which won’t cost a huge amount of money and will help you to make pro YouTube videos. As long as the tripod is sturdy and compatible with your camera (most cameras have multiple mounts to allow you to use them with tripods) then you are good to go.
Lighting
The best cameras in the world will do very little in conditions which are too dark. Darkness is the enemy of your video, and this can all be fixed with an affordable and easy-to-buy lighting kit.
If you don’t get enough light into your camera, it has to increase its sensitivity to light, which means it can go grainy. Have you ever noticed how holiday shots taken outdoors look so much better? The exact same applies.
Options then include shooting outdoors. However, to shoot your video outdoors you will need to make sure it isn’t so sunny you are squinting or the light is uneven. Ideally, conditions should be overcast as what we are looking for when it comes to video is soft light.
Soft light can be provided by a home studio lighting kit which can cost $50-100. These products are not high in technology, they are just lights with softeners and diffusers. These lights should then be put onto stands and allow you to position where you need to so that your camera is getting plenty of light into it at all times throughout the shooting of your video.
A photographer or videographer will tell you how getting the right kind of light is vital. A good lighting kit gives you options to choose, and there are plenty of video lighting tutorials out there.
Fovitec – 2x 20″ x 28″ Softbox Continuous Lighting Kit w/ 2000W Equivalent Total Output
A great example of the sort of lighting you can use is the Fovitec continuous lighting kit. The fact this will provide a constant light rather than flashes is what we need for video. It comes with sturdy stands, energy-saving bulbs and soft boxes and softeners to stop the light from being too harsh.

There are two lights included in the kit that you can purchase from Amazon here (Click here to check price) and using a lamp from your home can act as a third light (back light) so many of the techniques which are used in video above can be incorporated with ease. The fact that this lighting kit is pretty affordable is a bonus, but it truly is up to the task if you are looking to make a professional video.
Editing and Post Production
It’s easy to wonder why this is totally necessary. You’re making a guitar video for your YouTube channel, not editing the next Christopher Nolan video. However, a professional editing suite and software can allow you to give your videos that clean cut feel that makes them stand out from all those bedroom guitar videos!
Video editing software may well be on your computer already. iMovie or Windows Movie Maker are okay as starting points, but the key advice is to upgrade. You can use Reaper which has some good basic editing capabilities for video as well as audio, and means you can do all of this editing in one simple project. If you want something more similar to what the pros are using, Final Cut or Adobe Premier are good options.
Some of the things you can incorporate to your editing for a more professional feel include:
- Adding idents or graphics to the start of your video.
- Cutting in an introduction with you talking straight to camera about the contents of your video.
- Green screening. You can buy a green screen online and use this to remove the background of your video, allowing you to appear anywhere you like.
- Color correction to tweak your video to look more like real life and adjust based on any white balance imperfections.
- Multiple camera angles. If you have gone with more than one camera, this is where the editing will take place to let you use both and keep things more interesting for your viewers.
- Synchronizing video and audio. This is key, and using a clapper board (or just clapping before takes) can help you to sync by looking for the spike in audio and where your hands meet in the video.
You can see why editing can help you to make the video appear all the more professional when it is finally finished, and how all of the equipment we’ve listed will not be worth it if you can’t bring it all together into a well-polished final product and a video you’re happy to share with the world.