
One of the huge benefits of the increases we’ve seen in music technology in recent years is the fact that we are now able to do things with a portable setup.
Whereas years ago you needed a recording studio to get a professional sounding recording, in the 21st century we live in an age where even USB mics can provide clear audio and are creeping into professional recordings.
In this post, we’re looking at the best ways to record guitar while traveling, whether you’re touring, practicing at a friend’s or traveling around for any other reason.
Recording guitar while traveling can be done by creating a portable setup.
For this, you need some device to record onto, which can be a laptop but also could be a phone or tablet.
You will also need a microphone, and a way to connect the microphone to the aforementioned device. If you’re using a USB mic, this can usually be done very simply, and the signal provided is strong enough to record.
If you’re using an XLR based microphone, you will need an audio interface to boost the signal and communicate with your laptop or device and make a quality recording.
Along with a portable setup, you need to know a little about acoustics and work out some techniques for getting the most out of the setup.
Why Record While Traveling?
It can be easy to think that recording on the move is something you don’t really need to do as a musician. There’s always the next time you visit the studio, right? Well, actually, recording on the move has a huge amount of benefits even if you don’t immediately think of them.
Of course, if you can get audio recordings that you can use as part of songs you plan to release then this can be hugely beneficial, and it certainly isn’t impossible when you’re recording on the move. If you use a good enough microphone and you are sensible about where you record then pro results are achievable. Even if you don’t end up using them, there are other benefits. These include:
- The ability to listen back to your practice sessions. If you want to tighten up your playing and feel confident that you are sounding good then recordings are very helpful. In real-time, while listening, it can often be easy not to notice errors as you’re focusing on playing the songs.
- The ability to record new ideas so they don’t get forgotten. We’ve all had times where we’ve been playing around on the guitar and come up with a new idea for a riff or a chord progression, or just a new way of playing a song. The best way to keep this in your consciousness is to write it down. A huge amount of guitarists don’t know how to read music and writing tab can be time-consuming. Recording an idea makes it simpler to recall at a later date.
- You can send your recordings to others. Bandmates and friends can either give feedback or collaborate and add their own parts to the recording. In the modern age, it is easier than ever, you can record something and send it halfway around the world in a matter of minutes.
Suitable Places for Recording
If you have a portable setup then the world is your oyster in terms of where you physically can record, but that doesn’t mean you will get good results in every place you plan to record. In fact, there are many examples of places where you should definitely not record, and things to look out for when scouting for a location to record.
A lot of the places you should avoid you will know based on common sense. Don’t record in congested areas such as a coffee shop or a shopping mall. If you are using a microphone then you will pick up lots of noise from around, even if the mic is designed to cancel this sound out to an extent.
Instead, you should be looking for places which are quiet and don’t have a lot of reverb. Reverb and echo (delay) can come from a lot of flat surfaces which reflect the sound back through the room.
This is not something you will want from your recordings, and even if the effect is something you want it is worth adding this afterward for more control. This is easily done.
Generally speaking, any room which has a lot of furniture in it tends to have decent acoustics for recording, especially if it has sofas and duvets. Hotel rooms, tour buses (not ones with the engine on) and even dressing rooms might allow for decent recordings.
What Equipment is Needed?
When trying to get a good quality recording of your guitar, some equipment will be needed. For really rough recordings, a phone microphone will be okay, but realistically this audio is only useful for listening back to privately rather than using. The equipment doesn’t have to be expensive.
An Audio Interface
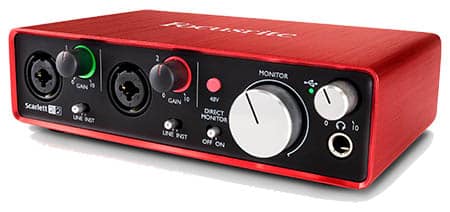
If you’re using a laptop, one of the best ways to record is to use an audio interface. This will normally work using USB for both power and connectivity. You will then be able to plug a microphone (or often a ¼ inch jack) into the interface. We recommend the Focusrite Scarlett 2i2 (click here to check price on Amazon), an interface which is very easy to install and use and gives good results. It is also compact and really portable.
Specific interfaces can be purchased if you want to record onto an iPhone or another device.
Software
Some sort of software to record into is required. This may well be called a DAW (Digital Audio Workstation). This allows you to control the microphone and make your recording, and can also let you edit and add effects.
The DAW is basically the software you will be recording onto.
For extremely basic applications (for instance, if you just want to record your practice to listen back to) you can use Audacity. Audacity is totally free and does have some inbuilt effects. It lets you do the basics, such as ‘topping and tailing’ the audio and exporting to different file types.
Reaper (click the link to visit the site) is an excellent affordable alternative that lets you do a lot more than Audacity. It is also expandable with plugins, many of which are free, and allow you to add effects to your guitar recordings.
Reaper can be used on either Mac or PC. Though the pricing structure can vary depending on the type of musician you are, it is more affordable than many alternatives and also allows a free trial.
Microphone
A microphone is normally needed, especially if you are recording an acoustic guitar.
If you wish to bypass the need for an audio interface you can opt for a USB microphone, which will provide you with the option to just plug straight into the device and record. Many of these are also compatible with phones.
Options such as the Blue Yeti microphone are extremely popular if you are looking to record using USB.
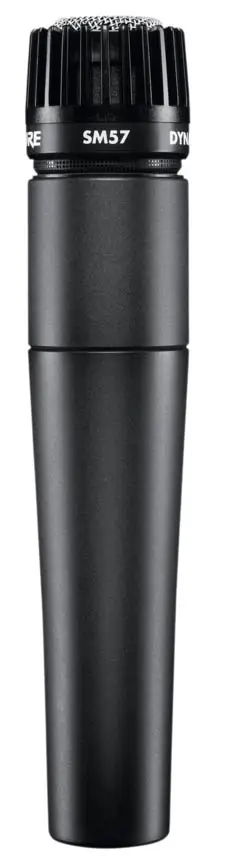
Alternatively, a versatile and robust microphone such as the Shure SM57 (click here to check the price on Amazon) can be useful if you don’t need USB compatibility.
A Specific Guitar Interface
Some audio interfaces are designed specifically for guitar. Some of these have their own inbuilt effects and can produce great results for electric guitars or for acoustic guitars which have pickups (electro-acoustic guitars). These interfaces allow you to simply plug in via a ¼ inch jack and record into your software, you can monitor your recording using headphones.

Options like the Line6 Pocket Pod (click here to check price on Amazon) are great for taking on the move with you and recording. This interface can allow you to record with ease and even has its own software. This is great for use with a laptop specifically.
How to Get Professional Results
There are a number of things to remember when trying to get professional results from your guitar recordings. The hardware we now have available is so much better than it was even 10 or 15 years ago, and if you learn a little about recording then you can absolutely get results that sound like they came straight out of a recording studio.
Tips for pro recordings include:
- Pay attention to the acoustics of the room, if it sounds like you’re playing in a cathedral you should probably try and record somewhere else.
- Always do a test run through to see what the audio quality is like. There’s not much worse than playing through a full take brilliantly and noticing the audio was too quiet or unusable somehow.
- Make sure your guitar is tuned. This sounds incredibly obvious, but so many guitarists don’t tune up before making a recording and then regret it afterward.
- Don’t overload the microphone with loudness. This will cause peaking or clipping which is signified in software or on your interface with red lights on the audio signal monitoring.
- Make multiple takes. Even if you think you don’t need to, having more to work from is normally a very good thing.
- Don’t record with loads of effects. These can be added after you’ve made the ‘dry’ recording, but if you make a recording then decide you don’t want the effects they will then be impossible to remove.
Conclusion
There are multiple ways of making recordings and the method you opt for will probably be impacted by whether you’re recording acoustic or electric guitar as well as the environments you plan to record in.
Having the ability to record guitar is a skill which can come in very handy, even if you don’t plan on releasing those recordings into the world, and the setup for allowing you to record guitar on the move doesn’t have to be difficult or expensive.