
The guitar solo is a wonderful thing. After measures and measures of singing and grooving, the guitar is set loose to what it pleases. In most popular music today, that time of freedom is a mere 4 bars, 8 if you’re lucky. Iconic songs of the classic rock era tend to be more friendly to the guitar solo, but more and more underground rock, NuMetal, Djent, etc. are giving the guitar more space.
There are two scenarios one will encounter when learning how to solo. The first is learning an existing solo by ear, often with the aid of some tablature and/or private instruction. The other is when a guitar player in a band gets his or her shot to play a solo during a performance. In either scenario, having a system in place is key if you don’t want to be overwhelmed with all of the note choices available to you.
I remember my first solo very clearly. I was fifteen years old and was given the veritable Key to the City and I was unleashed upon the audience. I was so excited up until the moment came to play the solo and I was utterly unprepared. I was like a dog chasing a cat and now that I had caught it, I didn’t know what to do with it!
From that moment, I spent countless hours training my ear and reading tab to be able to learn solos note-for-note. It wasn’t until years later that I discovered the CAGED System and I realized all of those hundreds of hours could have been put to better use.
CAGED was not the only method I used, nor is it the only method I teach for learning how to play guitar solos, but it is a good starting point and a good weapon to have in your arsenal. If you thought CAGED was only a way to learn chords, you will be pleased to know that it can help your knowledge of scales which in turn bolsters your ability to learn and create tasteful solos.
The CAGED System: A Quick Review
If you haven’t familiarized yourself with this system, then check out our article here What Is The CAGED System? A Complete Beginners Guide which goes into more detail. Below is a quick recap.
The CAGED System is a five-pattern system that uses the shapes of the C, A, G, E, and D chords to make chords. It maps out the neck in such a way that all twelve major chords and variations of those chords can be played in up to five different positions on the neck using these five shapes.
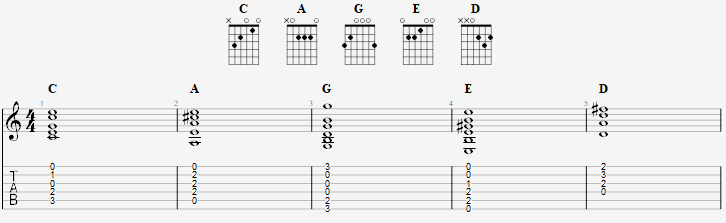
Chords are not the only subject covered by the CAGED System. Each of these five patterns also yields five positions for any given major scale.

Learning each scale position is a good step in learning how to solo. It breaks down the neck into chunks rather than mapping out the scale along the entire neck which can be overwhelming to say the least.
Using CAGED To Solo: Step-by-Step
Allow me to break this down by giving practical steps on how to go about using the CAGED System to solo.
Step 1: Learn the root notes
Most guitar instructors will tell you that the best way to be equipped to play solos and lead lines is to know all of the notes on the neck cold. Memorize each fret on each string. I agree with this, but there’s no need to get carried away just yet. Start with learning only two strings – the E and A strings.
The 6th (E) and 5th (A) strings are where the bass notes of the guitar live. Know where the notes are on these strings and you will be able to locate a key very quickly and base all of the rest of the notes of the chord or scale on the location of these notes.
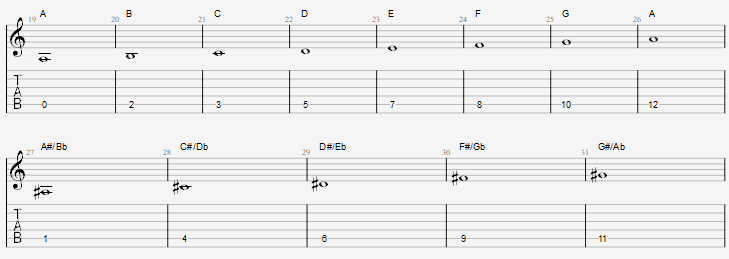
There are only twelve notes in the western musical alphabet; seven natural notes and five accidentals (sharps/flats). Between each note is a whole step (two frets) with the exception of B-C and E-F which are only a half-step (one fret). The E string is mapped out as follows:

The notes in between are the accidentals:

And the A string:
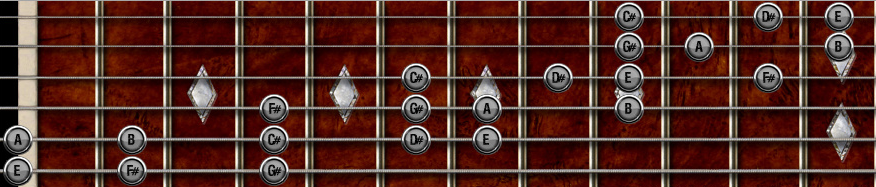
Step 2: Learn the scale shapes in one octave
The image of the scale shapes above is useful, but another way to go about it is to start and end on root notes and omit the outliers that go below the root and above the octave, and focus on just one octave. For this step, it’s only necessary to learn four of the five shapes:
C-Shape
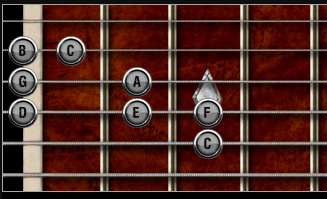
A-Shape
G-Shape
E-Shape (root on 6th string, 8th fret)
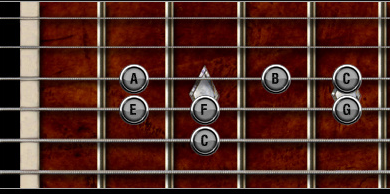
Step 3: Apply each scale position with a corresponding root note
The C and A shapes on based on a fifth-string root note, whereas the G and E shapes are based on a sixth-string root.
Change your starting note to each of the 12 notes in each position to get the base down for all twelve major scales and memorize those positions. If you know what key you are playing a solo in, this allows you to determine where on the neck you will be soloing.
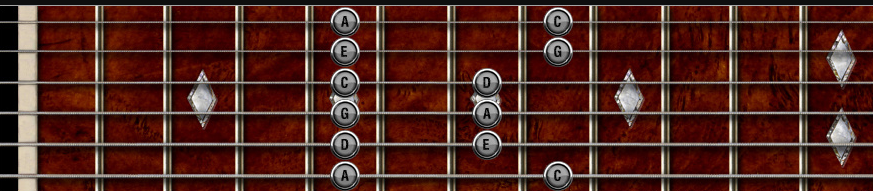
Step 4: Learn the two-octave scale
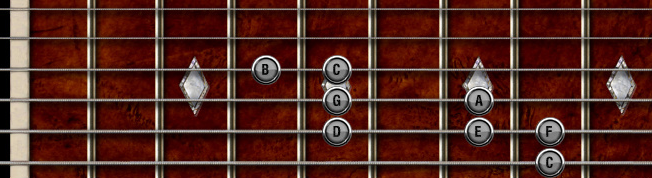
You are now ready to expand to a two-octave scale. It is often necessary to combine two positions. Here’s an example in C major:
In this example, the low end of the A-shape is combined with the high-end of the G-shape.
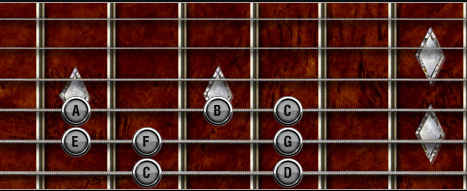
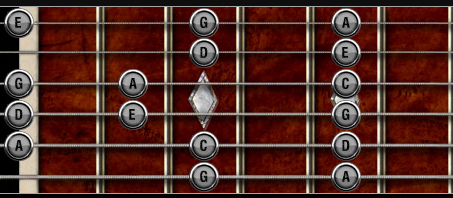
Here’s an example in G major combining the E and D shapes:
At this point, the map of the neck becomes more expansive and you as the guitar player are able to see more of the notes that are available to you in a given key.
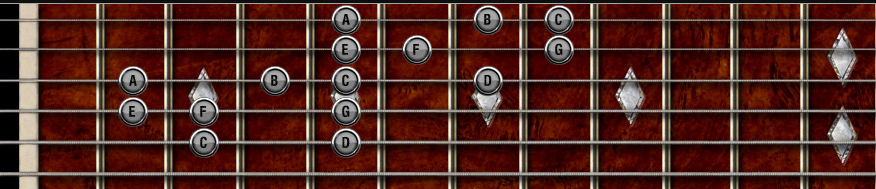
Step 5: Three-octave scales
This is the E major scale starting at the open sixth string and ending at the twelfth fret of the first string. A lot of ground is covered as it touches some part of all five CAGED positions. This allows the player to think in a more linear fashion and see the neck as a whole.
Step 6: Learn the minor pentatonic scale
This scale is what is predominantly used by guitarists in blues and rock. The most frequently used position of this scale is based on the E shape, or in this case, the E minor shape.
Many great riffs, fills, and solos use this scale. In fact, if rock and blues are your genres of choice, this scale will get the most use. It’s worth working on this one.
Another common position of the minor pentatonic scale is based on the A shape:
After learning this scale, it’s only two more notes to get it to the 7-note natural minor scale, so you might as well knock that out! When it comes to minors in general, the A and E shapes are the most used and tend to be more finger-friendly.
Step 7: Pedal point exercise
I picked E major for step 5 and A minor for step 6 because these are very friendly keys for practicing step 7 using a pedal point. A pedal point is a musical “home base”. In the case of E major, the pedal, or drone, is the open 6th string – the lowest E on the guitar. The idea is to play this note to give your ear a tonal center.
Play the pedal, then improvise a melody using the notes of the major scale. Any position, any octave, any amount of notes. Once you have played a melodic passage, return to your pedal point to “reset”. With the Am pentatonic, the open fifth string would be the pedal.
This is the perfect exercise for a guitarist to practice a scale. No backing track is needed and there are no distractions. I practice this every time I sit down with my guitar. Every. Time. It is how one practices creativity with a scale rather than the note-by-note scale that goes in order from lowest to highest, then back down highest to lowest. In order to learn and play guitar solos, the only way to really practice a scale in my opinion is to practice it musically, not methodically, or theoretically.
A great resource for learning the scales – and if you’re really adventurous, learning the modes – is Joe Satriani. He has several good videos on this subject. Here’s one he did with Guitar World.
Putting It All Together
Once you get comfortable with these positions and your choice of fingering, it’s important to apply these principles as soon as you can. Applying them creatively with the pedal point exercise is encouraged, but one also needs to learn music from another source. This helps to train the ear as well as expand creativity by being inspired by some of the great music that is out there.
Riffs Before Solos
Rather than starting off learning a solo, learn a riff or hook line. These are melody lines that are simpler, catchier, and repetitive, and are generally written more purposefully than a solo is, but riffs employ the same ideas.
Before jumping into the deep end by learning the guitar solo for “Free Bird”, try a more bite-sized morsel such as Michael Jackson’s “Beat It” featuring Eddie Van Halen, or “Crazy Train” by Black Sabbath.
These hook lines are just little guitar solos that are simplified in order to create something unique by which to identify a song.
Learning A Solo
A solo differs from a hook in that a hook is typically repeated in various parts of the song whereas a solo is a one-and-done. There may be multiple solos in a song and solos will differ in complexity and intentionality. Some solos are carefully written with room for improvisation, some solos are made up on the spot, and others still are very short and simple.
Try starting with the later – short, simple, and deliberate. In other words, pretty much anything from the 90s! =D
We will use the steps outlined above and learn the guitar solo for “Champagne Supernova” by Oasis.
1. Use the root notes on the fifth and/or sixth strings to determine a probable key.
It might take some time and a bit of trial and error with many songs, but the root is typically indicated at the very beginning of a song. In this case, it becomes apparent right away the key is A major.
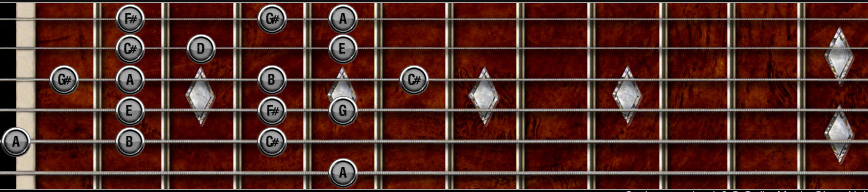
2. Review the shapes of the A-Major scale
Let this serve as way to calibrate your ear to be sensitive to the notes you are hearing so that you can match them up on the guitar.
3. Pick one of the five positions
If you are doing this by ear, this will take more time but will be the most beneficial way to train your ear if that is a goal of yours. If you are using tabs, then look at the range of frets to determine which scale position is being highlighted. In this case, it’s the 2nd position (the second fret is the lowest fret) which happens to be the A-shape. This can be our starting point.
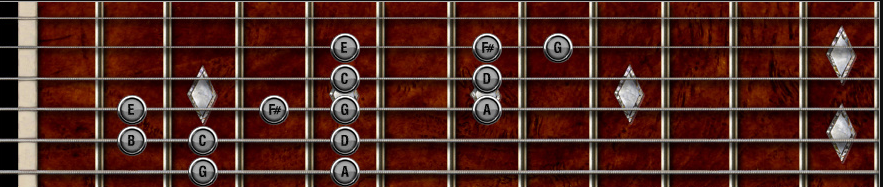
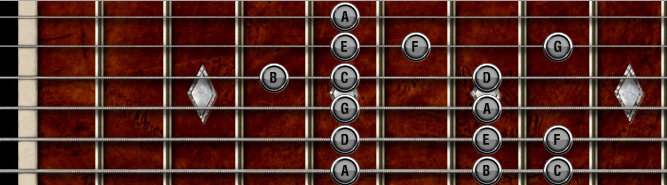
4. Have at least 2 octaves mapped out
Whether doing this by ear or using tab, be prepared to cover at least two octaves when learning a solo. This will give you a second CAGED shape to work with. With Champagne Supernova, we can use this roadmap:
Two octaves are covered, we are mainly using the A-shape, but borrowing some notes from the G-shape. There are duplicate notes on this map which is a good thing. Instead of playing the higher C# on the second string, that same pitch might be better to play on the third string depending on the context. Have options.
With the steps, that’s as far as we need to go in terms of preparation. Now we are ready to pair notes with rhythm and play the solo:
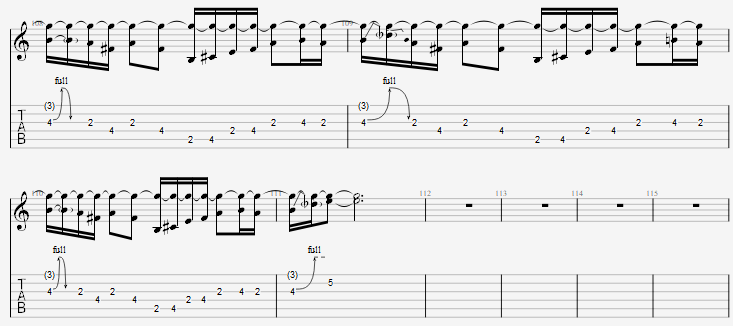
One solo in the books! At this stage, techniques such as full step bends, slides, grace notes, etc., don’t need to be focused on so much. The important thing here to is to train the ear and use the CAGED System to help map out your moves.
Try this with any solo you wish. I don’t recommend solely relying upon tablature that is found on the internet or even in a published book. Simply memorizing frets will not make you a better player or teach you how to learn solos. The key to developing oneself as a guitar player is to learn how to learn. Understand the positions of the neck, know where your root notes are, and learn the scale shapes.
It’s all downhill from there.