
Not happy with your current cheap guitar? Perhaps you have moved up in the world as a guitarist. Time to get a new guitar! Or is it?
Sure, a new guitar would be nice, but we are talking somewhere north of $800 or upward of $1000+ to get that next guitar if it is to truly be an upgrade.
There are plenty of ways to take your low-end or even mid-level guitar and make relatively small changes that will make a world of difference. Here, we are going to go over the best improvements you can make to the guitar you already have and turn it into the guitar of your dreams — or at least get close.
New tuners, replacing the nut, upgrading the bridge, or even going so far as to replace the frets are going to be a serious boon to your instrument. Even basic maintenance like adjusting the string height, getting different gauge strings, or simply adjusting the height of the pickups can do wonders. So let’s do a quick rundown of all the options you have to make your electric guitar play like a new axe.
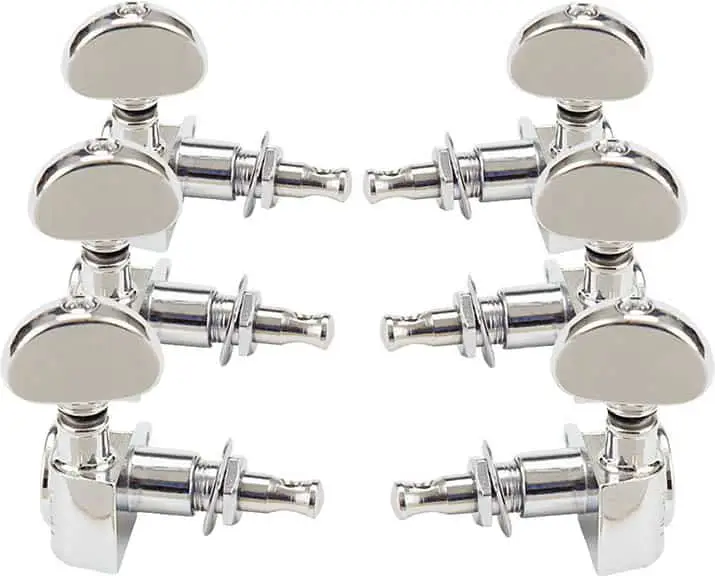
1. Upgrade Tuners
Benefit: better tuning stability
Cost: $30 up to $100+ depending on the tuner and labor required
DIY Difficulty: easy – intermediate depending on tuner specs
We will start at the head and work our way down to the body. Starting at the top, one of the best ways to improve a cheaper guitar is to replace the tuners. Less expensive guitars will often have tuners that are mediocre at best and can fail rather quickly, causing tuning issues. As we all know, if you can’t stay in tune, you will sound terrible forever.
Swapping out the stock tuners on your Ephiphone Les Paul with a set of Grovers (check price on Musicians Friend) may be just what the doctor ordered to fix a tuning issue. Of course, other things affect the tuning which we will discuss momentarily, but tuning quality and retention starts at the tuning machine.
Locking tuners (check price here on Musicians Friend) like are often a popular choice for an upgrade as they provide maximum tuning stability, especially if you are making regular use of the whammy bar on a vibrato system.
Replacing your tuners may not be as simple as just dropping in a new set where the old ones used to be. Unless you are getting the exact same type of tuner with the exact same specifications and measurements, some adjustments will be required.
A great instructional video for this is found below from Erick Coleman with Stew Mac if you want to try doing this yourself.
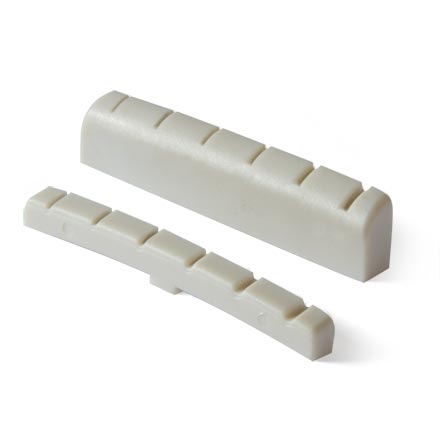
2. Upgrade Nut
Benefit: Tone improvement, better tuning stability
Cost: $10 – $20 / $50 – $100+ for professional install
DIY Difficulty: Intermediate for pre-shaped nut
This is an often overlooked part of a guitar, but it’s quite important. This is one of the points of contact for the string to vibrate and produce sound. The nut affects the tone of the guitar in profound ways. It also affects tunability as the strings needs to be allowed to glide freely in the slots when tuning, playing, or when the body of the guitar expands and contracts due to atmospheric changes.
Cheaper guitars will have plastic nuts which hinder a string’s ability to vibrate and sustain properly. They aren’t as smooth as higher quality materials, so strings can often get stuck in the slot. Plastic nuts also wear down very easily from the friction and tension of the strings.
Upgrading from plastic to ivory or bone will make a noticeable improvement in tone and tuning stability. There are also synthetic materials such as TUSQ which is a manmade ivory, or Micarta which is a synthetic bone. You can go crazy with fossilized walrus ivory, but obviously that’s a bit excessive for a cheap-o as that tends to cost over $200.
Oftentimes, you can buy a nut that is already shaped and ready to drop into the nut slot. Some sanding will probably be required to achieve the proper height. Most guitars have a flat nut slot, but older guitars may have a radiused slot so the replacement nut will need to have the bottom sanded to a radius to match the slot.
It is recommended you have a professional install a replacement nut for you, but with a little effort, it can be done for quite a bit cheaper. If you are the DIY type, then I will again point you to the experts at Stew Mac, this time with Dan Erlewine
Lots of money can be spent on a new, custom made nut at a repair shop depending on material and labor, so I would recommend their cheapest replacement option (usually pre-shaped TUSQ).
3. Upgrade Frets
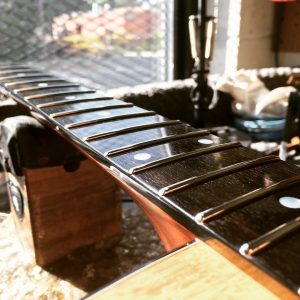
Fret Dressing
Benefit: improved intonation and playability
Cost: $125+ (partial); $150-$200 (all frets)
DIY Difficulty: Advanced
Fret Cleaning & Polish
Benefit: improved playability, slight intonation improvement if really dirty
Cost: $5-$20
DIY Difficulty: Easy
This can be a rather expensive job. To do a complete refret will is typically well above $300 and can get over $400 for stainless steel frets. For this kind of work, no one would recommend doing this for a cheap guitar.
However, what you can do is get what is called a fret dressing or a fret level, crown, and polish. Depending on your local shop’s rate, you are looking at somewhere between $125 and $200. You will need to assess the value of your guitar and how much you like it in order to justify the expense.
All guitars at some point in their life will need this work to be done. The frets wear over time and become pitted. This has a negative effect on the intonation of the guitar and can cause buzzing. Gnarled frets can also be quite uncomfortable to play, especially if they are sharp on the edges.
Fret dressings require professional skill, so this is not recommended as a DIY project. If you want to get into doing this yourself, you need to practice on a piece of junk guitar (or three) that you spend no more than $50 on.
What you can do yourself is clean and polish your frets. You would be surprised at how much more comfortable the guitar will play. For doing this, you just need some polishing paper (check price at Amazon) and a fretboard kit like this one at Amazon. Cleaning the frets and fretboard do wonders to the playability. Plus, dirt and grime on a fretboard can make a guitar play out of tune if gone unchecked.
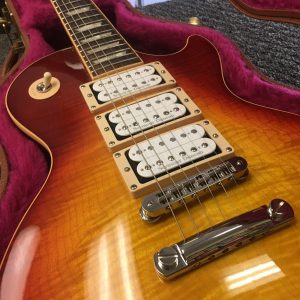
4. Upgrade or Modify Pickups
Upgrade
Benefit: improved sound, possibly significant
Cost: $50-$80 plus $50-$60/hour of labor
DIY Difficulty: intermediate – advanced; requires basic knowledge of electronics and soldering technique which takes practice
Modify
Benefit: Significant improvement in tone and more options
Cost: $200-$400+/- (typically quoted by job)
DIY Difficulty: very advanced
One of the most popular upgrades to an electric guitar is a pickup upgrade and/or modification. As with other upgrades, the choices here can be vast. A simple upgrade is probably the best option to go with before going with a modification.
By modification, I mean when a bit of (invasive) surgery is required. Pictured above is a “Triple Mod Pickup” job at my buddies shop near where I live in Charlotte, NC. These jobs can get quite expensive, so again this would be an example of overkill on a cheap guitar.
Instead, a pickup upgrade is likely in order for you. If you have an Epiphone Les Paul, maybe a set of Golden Age P.A.F.-type pickups are the way to go to really transform your sound.
Or perhaps you have a cheaper Fender or Squire Telecaster. In that case, going with these ones available at Amazon (check price) makes a lot of sense.
If you have a cheaper Ibanez or even a Strat or Strat-like guitar with a humbucker at the bridge, maybe these Seymour Duncan humbucker pickups at Amazon are more your flavor. If you are hard rocker with an cheaper ESP or LTD guitar (or one like it), you may get very nice results from a new set of EMG pickups available here at Musicians Friend.
Like I said, lots of options. This is another one that is best left to professionals or, at the very least, someone comfortable with a soldering iron and basic understanding of electronics. If that’s you, then by all means, go for it. The worst that can happen is you wire it wrong and you have to pay someone to wire them up anyway.
Actually the worst that can happen is you short out your guitars entire electrical system, so if you have Tim “The Tool Man” Taylor levels of clumsiness, then you will be paying a little bit of a Stupid Tax for getting in over your head.
Before you go off and buy a set of pickups, do a little research to get the basic idea of what the different kinds sound like. Although it’s a bit of a rabbit hole, it’s pretty easily researched. If you are unsure where to start, just find out what kind of pickups your dream guitar has or what pickups your local repair tech might recommend.
5. Upgrade Electronics
Benefit: fixes noise problems and can add additional power to a weak-sounding signal
Cost: $30-$75 depending on number and quality of replacement parts
DIY Difficulty: Intermediate
This can really be broken down into three sub categories. Obviously, I’m excluding pickups because they need their own category entirely. Potentiometers or “pots” (volume and tone controls), pickup selectors, and output jacks.
Pots (Potentiometers)
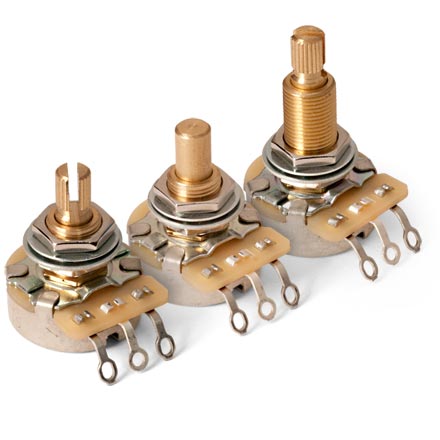
Getting a scratchy sound when turning your volume knob? Maybe there is a bad noise or the sound cuts out completely when the knob is moved to different positions? You could try cleaning the pot with a little contact cleaner, but chances are that a cheap guitar just needs the pot to be replaced.
Typically, the volume potentiometer is the culprit and is the one that should be swapped out, but it doesn’t hurt to go ahead and have the tone knob replaced as well since unwanted noise and a loss of tonal control takes place there as well.
Luckily, this is a very cheap upgrade and takes almost no time in the shop. Like with pickups, if you at least have a basic understanding of soldering and electronics, i.e., the difference between and ground wire and a hot wire, you can do this yourself on the cheap.
Pickup Selectors
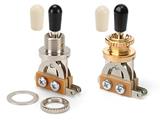
Not usually an upgrade per sé, but this can be an aggravating source of unwanted noise and clicking sounds when they start to go out. In cheaper guitars, it’s not at all uncommon for them to be wired incorrectly anyway, so best to just swap it out rather than re-solder it.
It is very common in some guitars for the selector to not click into the desired position at all due to one of the little half-moon metal snaps on either side breaking in two. I find this especially true in cheaper PRS, Epiphone, or any Les Paul-style guitar with the 3-way toggle switch. This is also a very cheap fix.
Output Jacks
This is also a common problem spot for crackling and sound cutting in and out. A lot of times on Stratocaster models (even the expensive ones), the issue isn’t so much the part, but the construction of the jack housing. Jacks on strats are notorious for coming loose and the frequent tightening of the stock parts usually leads to twisted wires and disconnected solder joints.
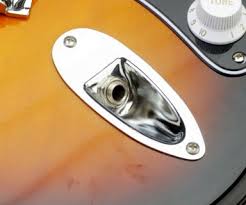
With Strat-style guitars, it’s usually as simple as using the new mounting nuts and washers that come with the replacement jack to alleviate that ailment. In some cases, it may be beneficial to install a new jack plate and have the screw holes filled in and re-drilled to really sure up the entire housing and keep it from moving around. It’s not that common to have to go that far, but it’s at least another cheap correction.
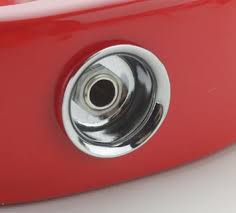
Telecaster jacks with the cup-style jack plate is something that I upgrade often for Tele owners unless it’s a vintage guitar. A very popular replacement for this has been the Electrosocket Jack Mount (check price at Amazon) and it’s added security from the inevitable accidental “cable tug”.
The reason I am lumping all three of these components into one category is because they tend to cost the same and fix a lot of the same issues. Upgrading all three at once is cheaper overall than piecing it out since it takes less time to take the guitar apart just once.
If you feel comfortable with your soldering skills and understand the basics of wiring, it’s easier to do these upgrades than new pickups. If you are doing one of these by yourself, go ahead and do all three areas. These parts typically come with new wires, so go ahead and swap those out as well.
6. Upgrade Bridge
Next up is the bridge. On an electric guitar, the saddle is typically included in a bridge replacement as opposed to an acoustic where you can just upgrade to a better saddle. This can be a game changer for cheap or middle-of-the-road electrics that have cut costs at the bridge.
A cheap Stratocaster will have a bridge that has not been machined as well and may have sharp edges and stripped out adjustment screws. Over time, hand sweat can corrode parts of the bridge and while that corrosion can be remediated, sometimes it’s better to go ahead and get a new bridge for a cheaper guitar.
On certain Gibson style guitars, the “tune-o-matic” bridge is popular. The problem with the cheaper (or older) ones is that they were not positioned correctly and will never play in tune, no matter how much you work on it. There is a very simple fix (YouTube video), however, that most shops are well aware of.
Most guitars with the standard tremolo bridge are easily replaceable. Better quality replacements will make tuning and playing much better in the same way a replacement nut does at the other end of the guitar.
With floating tremolos, I don’t recommend replacing one on a cheaper guitar. It’s far more cost effective to save up for a newer guitar with a better bridge system. Replacing these tremolos is only recommended for guitars that were a bit more of a financial investment.
If you really like your guitar with the floating tremolo, but the tremolo keeps pulling your guitar out of tune and is impossible to adjust, the “upgrade” I recommend is to have it blocked by your local repair tech so it doesn’t move anymore.
For this upgrade to really be worth it, be prepared to spend a little extra on this. You can easily do it yourself if it is a drop-in replacement, but it will require a setup afterwards. If you aren’t comfortable doing that yourself (most are not), then it may just be cheaper to buy the bridge directly from a guitar shop or luthier and have them install it for you – that will typically include a setup.
Benefit: improved intonation, smoother tremolo action, and in some cases better tone
Cost: $35-$100+ for a bridge, an additional $50-$75 for a setup. Cheaper if done at one time
DIY Difficulty: Easy for a drop-in replacement, intermediate to do all the setup work yourself
7. Get A Professional Setup
Benefits: Intonation, playability, tone – really everything
Cost: $50-$100
DIY Difficulty: Intermediate to advanced
Last on our list is just getting a professional guitar setup. This is really standard maintenance for all guitars, but most novice players put this off completely.
Over time, the wood of the guitar expands and contracts. Screws loosen, electrical connections fail, strings need to be changed, and fretboards needs to be scraped clean. This is one of the most effective ways to make your guitar play better and keep playing well. If you have never had a setup done on your guitar, oh my. This should be the first thing you do. If you want to know what is involved you read the article we wrote What Is A Professional Guitar Setup And Why You Need One
This is typically needed about once every year, give or take, depending on the environmental changes where you live and how much you play.
I hope this has given you some valuable information so you can effectively upgrade your guitar. Buying a brand new guitar is not always the answer if you want better sound. Sometimes, it just costs a few bucks to completely transform your guitar.