
The CAGED System is regarded as one of the best methods of learning how to play guitar. This five pattern system teaches the entire fretboard and organizes it into an easy-to-understand system so a student can learn chords, scales, and capo usage just to name a few.
As a teacher, I use this system all the time with my students. As a player and working musician, I have internalized this system so I can have the neck mapped out in my mind so that playing, transposing, and transcribing are all just second nature.
This system is so brilliant that it allows you the guitar student to not just learn how to play guitar, but how to teach yourself to play guitar. Since it is designed to organize the fretboard so that it is no longer simply a blank slate of wood and wire, it is important for a guitar student to organize their practice to learn the CAGED System in an efficient and effective manner.
How To Practice The CAGED System
There are several easy, key steps in practicing the CAGED System effectively. You can incorporate as much or as little of this as you want in your practice routine, but there are some basic prerequisites one needs to establish before digging in.
- Step One – Learn the five chords – C, A, G, E, and D.
- Step Two – Learn all of the notes on all of the frets on at least the 6th and 5th strings. Start with the 7 natural notes (no sharps or flats).
- Step Three – Apply the five shapes of CAGED to each of those five chords, using the notes on the fifth and sixth strings as the root notes for reference.
Once step three is achieved, you are ready to expand upon the CAGED System. It is possible to stop there and you would have greatly benefited from this five-pattern system by expanding your knowledge of the neck and significantly increasing your chord vocabulary.
CAGED offers a whole world of possibilities when it comes to learning the fretboard. It would be wise to unpack step three of the above list before moving on to other ventures. Beyond expanding chord vocabulary, the CAGED System is great for learning scales and dabbling in solos, which we explore a bit further down.
How To Learn The CAGED System
At the heart of the CAGED System are the five chords that give the five-pattern system its name. Learning the C, A, G, E, and D chords, however, is only the beginning. It’s not so much learning these chords as it is learning their shape.
These shapes are transferable to different positions up the neck. In fact, these five shapes can be used for all twelve major chords as well as a few of their minor counterparts. Applying these five positions to twelve keys shoots your chord vocabulary up to 60 chords at a veritable snap of a finger. It’s much easier to learn five positions than learning sixty chords cold, wouldn’t you say?
The best way to start is just by using the five chords of CAGED and moving each chord up the neck using the other four shapes.
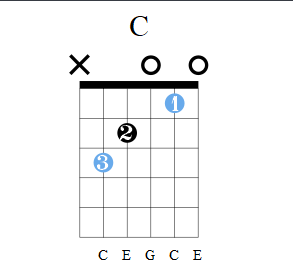
For example, start with C in the open position.
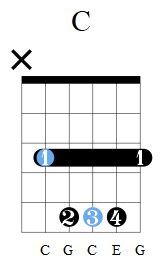
Then, use the root note (5th string, 3rd fret) to form the A-shape of C in 3rd position.
Follow that with the G-shape. Here the root is on the sixth string as with the actual G chord, which places the G-shape of C on the 8th fret.
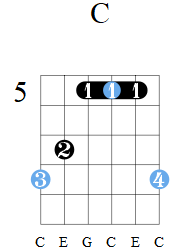
The E-Shape is next with that root note also on the 6th string, 8th fret.
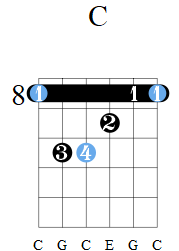
Finally, the D-shape has its root on the fourth string. The C note is on the 10th fret.
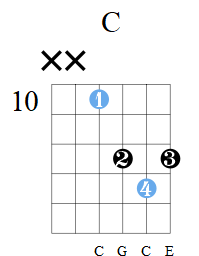
Presto. You have played all five positions for the C major chord using the CAGED System. Repeat this idea for each of the other chords. The A chord will travel up the neck in the order of A, G, E, D, C, starting at the open position. The G chord goes up with G, E, D, C, A and so it goes.
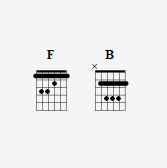
There are two natural major chords left which are the F and B and those are easy enough to begin practicing. The lowest available F chord is derived from the “E” shape, while the B chord uses the “A” shape
After you get the idea of CAGED with the seven natural major chords, the five accidentals are easy enough to get down since it’s just a matter of going up or down by a single fret.
How To Practice CAGED Scales
The CAGED System is also a useful tool when learning scales. Learning the scales in each of the five positions opens up two possibilities for any guitar student. For one, the student is able to learn the degrees and intervals of a scale. The various degrees of the major scale are as follows: Root, major 2nd, major 3rd, perfect 4th, perfect 5th, major 6th, major 7th, and the octave.
These intervals can be used in various combinations to form chord formulas so one can learn how to play different types of chords such as Cmaj7, Cadd9, C13, Csus4, and so on. Simply add one of these notes from a scale to an existing chord and you can come across some cool chord variations.
The second opportunity that opens up is for a guitar player to start exploring what it means to play a solo, melody, or riff. For any guitar player looking to be a lead guitarist, learning all of the scales covering the entirety of the neck is pretty close to being a requirement. It’s a tall order to be sure, but using the CAGED System can bring order to this chaos and help to take on this challenge in more bite-sized portions.

Each of the five positions is represented in the diagrams above. Be patient and really take your time practicing these.
Pro Tip!
My recommendation to most guitar students who practice 20-30 minutes per day is to spend one week per position. I know to most people that seems agonizingly monotonous, but if you spend a whole week playing just one position, you will start to get bored.
Getting bored is good! Why? If you use some discipline and really focus here, as your brain gets bored, you will almost involuntarily get creative. The mind will tire of doing the same thing over and over and start to think up new, more exciting ways of practicing each of these positions.
This idea is not unique to me. I learned of this idea from an old Steve Vai article that talked about musical meditation.
Once each position has been learned, it becomes time to put it all together in one, seamless journey from the lowest part of the neck up to the last possible fret. This part is optional for most players as it really benefits those who want to learn how to create melodies and play solos.
The way to practice connecting these positions uses a technique called “position shifting” where the player picks strategic places on the neck to play more than three notes on a single string to quickly move up several frets in one deft move.
Here’s an example in Gmajor:

Two major shifts happened here; one shift on the fifth string going from the 7th fret up the 9th, then another one on the fourth string shooting up to the 10th fret with the first finger after playing the 9th fret with the fourth finger.
Using this technique, one can travel three whole octaves of a scale spanning the length of all five positions. One can of course choose to go past the last octave or to duplicate the higher pitches and access higher frets.
How To Solo With The CAGED System
By practicing the scales in all five positions and learning the position shifting technique, one is ready to learn how to solo using the CAGED System. The next step in doing this is to learn the location of the chord tones of the major scale. The chord tones are simply the notes that make up a chord. For a major scale, these are the first, third, and fifth notes of that scale.
Trying to solo with only three notes is a challenge in creativity because, on the surface, it seems quite boring. As mentioned before in the idea of musical meditation, this limitation is strategic in order to get your brain to explore ways of making something monotonous into something unique and musical.
Start by just trying to create a melody with the three notes of a C major chord – C, E, and G using this diagram as a reference:

Next, try practicing over a chord progression, starting with a two-chord progression such as //: C / C / F / F ://
For F, the chord tones will be F, A, and C. Only play those notes over the F chord.
Then, step it up to a three-chord progression. Try //: C / C / F / F / C / C / G / G ://
Since G has been added, now play the notes G, B, and D over the G chord.
There are several good resources out there for backing tracks for guitarists to practice their soloing. Try Guitar Tone Master or GuitarBackingTrack.com.
For more on this, check out the full article on How To Use The CAGED System To Solo.
Is It Worth Learning The CAGED System?
I am aware that much of what I have outlined seems tedious, challenging, and a test of one’s will power and patience. At first, it is tedious and challenging and it takes resolve and a certain level of focus. If you find your mind wandering, just practice pulling your thoughts back to the task at hand. The more you do this, the better your focus will get and this will get less and less difficult and become more and more enjoyable.
For me, it was rough the first few times I tried this level of structured practice since my mind darts all over the place when I have a guitar in my hand. But believe me, it is so worth it. I make my case in a separate article of all the benefits but just know for now that the main benefits of taking the time to learn this system will be significantly improving your knowledge and mastery of the guitar neck. What’s not to love?