
The most common issue among newer students who are learning acoustic guitar is in determining the manner in which to strum a song they want to learn. “What is the strum pattern?” and “How do I figure out the strum pattern?” are by far the most common questions.
In order to determine the strumming pattern of a song, you need to first keep in mind that the acoustic guitar is a percussion instrument, not just a melodic one. Get familiar with how rhythm actually works in music, apply that knowledge when listening to a song, and use that to decipher what the strumming should be.
Not many songs that were composed by a guitarist were written with the strum pattern as the main focus. There may very well be a precise rhythm, but rarely will a songwriter sit in the studio and wonder to themselves, “I wonder what strumming pattern I’m going to use.” In order to achieve this sort of mastery over the instrument, you have to learn how to not just play in time. You have to learn how to groove.
Playing In Time vs. Locking To A Groove
When you are first developing your sense of rhythm, you are spending a lot of time working with a metronome. Since you are human, your timing has a natural tendency to fluctuate. You might drag or you might rush. Your speed may increase and decrease at different rates throughout an entire piece of music. Generally speaking, if you can get to some basic level of consistency, you will get pretty good at playing in time.
Locking to a groove, however, is a little more nuanced than that. You can play in time, but never really groove with a piece of music. Most people’s natural tendency is to rush when they play. Some people drag, but the vast majority have a propensity to play too fast. Nobody can keep time perfectly the way a computer or machine can – and that’s the beauty of it!
There are times where you want to strategically play with a sense of urgency. Other times, you need to sit way back on the beat and almost be lazy with it. With that said, you still don’t want to play out of sync with everything else. If the singer is singing with a bit of a purposeful drag with the cadence of the lyrics, you don’t want to be in a hurry to strum your chords. If the drummer rushes a particular beat in a measure, you don’t want to be late.
The point is a groove is not just something you do, it’s a place you go (cue the contemplative soundtrack). The only way to lock to a groove is to listen actively and really soak in the atmosphere that is being created by a piece of music as a whole, not just what one part is doing.
I bring this point up before moving on with anything else because this understanding of timing versus a groove is everything if you want to be able to strum like a pro. There is a lot more to it than just knowing when to strum up or down and in what combination. The guitar is not playing separate from the vocalist, nor is it acting without considering the way the drums are being played.
The first step toward learning a strum pattern is to put your guitar down and just listen! All of the veteran musicians I have worked with over the years adhere to this practice. Professionals understand the importance of listening before playing. And not just listening to the song as a civilian fan would, but as a student of the craft.
Active Listening
As a guitar player, your first instinct is to pick up your guitar and try to mimic what you hear the guitar doing in the song you are trying to learn. I’m here to tell you that is not step one. Yes, listen to the guitar, but listen to what else is going on with it. If it is a recording with a full band, listen to the other elements – drums, bass, second guitar, piano, etc. – and notice how they are working together.
To simplify things, I tend to listen to the drums first (if there are any) which is easy because they tend to be the most obvious. If the acoustic guitar is a percussion instrument, then I want to pay attention to what the lead percussionist is doing and base what I do on that. More often than not, the strum rhythm for the guitar is going to be a direct reflection of what the drums are doing.
Think of the guitar like you would a drum kit. The low strings are the kick and the high strings are the snare. These will be the biggest landmarks to listen for as they are the loudest and most crucial for the overall pulse of the song. The hi-hat, toms, cymbals will give you more of a sense of the dynamics your strumming should follow – energy levels, volume levels, how many strings to hit, what “fills” to do to keep the momentum going, etc.
After the drums, move on to the vocalist. If it is a song without drums, the vocal lines are the first thing you will pay attention to and how the strumming compliments the gait of the lyrics. Some songs will be a little more difficult than others with this, but the vocal and guitar parts usually compliments each other relatively simply.
After checking these two off the list, you can move on and focus your attention on any other instruments that the recording might have in an order you wish. This will possibly have you listening to the song several times before you actually try to play with it, which is precisely the point of this mental exercise.
If you try to play along with it right out of the gate, you will be too busy to pay attention to some very important details. You can also play some tricks on your ears, confusing what you are doing on your guitar with what is actually being played by the recording artist.
This discipline of active listening is what I recommend you do before you dive into any form of music theory in regards to rhythm. The reason is, you don’t need to learn theory if you really don’t want to and if it’s not something you are interested in, it really is not worth spending too much time focusing on it and potentially burning out.
However, I think at least learning the basics of music theory in relation to rhythm is incredibly helpful. It will help you speak a little bit of the language and be able to communicate to other musicians. It will also be a boon to your listening abilities and be able to pick out strumming rhythms with ease.
Strum Rhythm Basics
Learning basic rhythm notation is very easy. You don’t need to bother with learning note values, fancy symbols, long Italian words, or anything like that. Instead, you are just learning the time values. If you want to go deeper you can, but you can get very far by just learning the basics. Start with learning time signatures.
A Time Signature is the stack of two numbers at the beginning of a piece of sheet music. On chord charts, they may just be written as a fraction. The top number is how many beats are in a measure. The bottom number defines which time value defines a “beat”.

Four-Four – The 4 on top means that there are four beats in a full measure. The bottom 4 tells us a “quarter” note is the time value

Three-Four – Another common time signature. This indicates there are three beats per measure. Again, the quarter note is what receives a count of 1. This is a common time for something like a waltz.

Six-Eight – This one is similar to three-four, but has a slightly different feel. The top 6 means there are six beats and the bottom 8 means that an eighth note is now receiving one beat. More often than not, this time signature places accents on the “1” and “4”: 1 – 2 – 3 – 4 – 5 – 6
There are a few more time signatures, like 2/4 and 12/8, but the three highlighted above are far and away the most common, with 4/4 being at the top of that list. I suggest doing a quick Google search of popular songs in these time signatures so you can start to learn how they feel and sound. You will want to be able to pick out a time signature by listening to it, which is actually a really simple thing to do to train your ears.
The next thing to do is to learn about time values. This will be the language you use when writing out or reading strumming patterns. The five basic time values for you to learn are whole notes, half notes, quarter notes, eighth notes, and sixteenth notes.
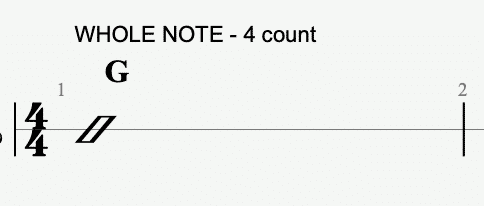
WHOLE NOTES are often written as you see above or in more of a diamond shape. Guitar players may refer to whole note strums as “diamonds”. This is a strum on beat “1”, and lasts for the duration of the measure.
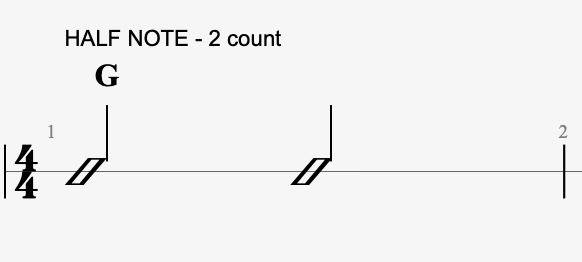
HALF NOTES just add a stem to the diamond or hollow slash head. These will receive two beats.
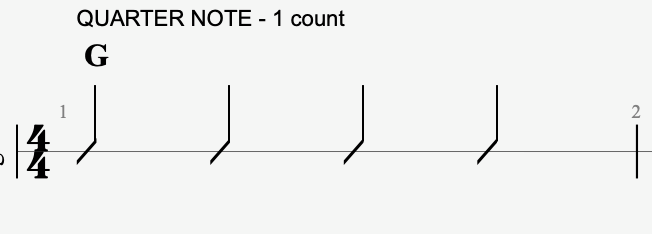
QUARTER NOTES get one beat. Strumming quarter notes is simply counting “1, 2, 3, 4” with each strum.
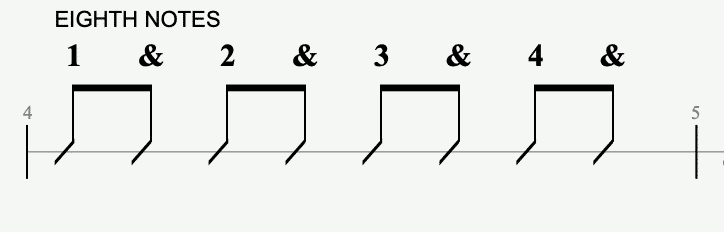
EIGHTH NOTES are counted using an “and” in the space between quarter notes. There are 8 of these in a measure of 4/4 and you can alternate between down-strums and up-strums in faster tempos.
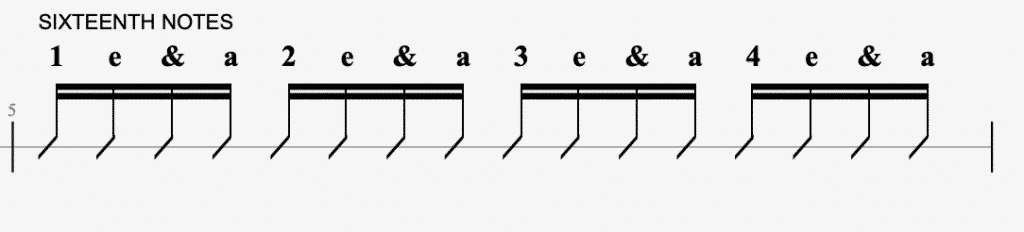
SIXTEENTH NOTES are probably the final subdivision you will learn. There are 32nd and 64th notes, but those are rarely used in strumming patterns due to the difficulty of their speeds. 16th notes will give you lots of options for creating and learning strum patterns, but it will take time to get them consistent. These almost always have to alternate between up- and down-strums, with the downstroke being on the down beats (1, 2, 3, 4) and their 8th notes (&), and the upstrokes being on the “e” and “a” of each beat.
It’s very important to have at least these basic understandings of how rhythm is laid out and defined. It will make learning strum patterns so much simpler and it will significantly increase your overall knowledge of rhythm.
*Going Deeper:
Along with each of the above time values, there are also “dotted” versions of each one. This is a rhythm slash followed by a little dot next to the rhythm head. The dot adds half the value of the slash to the timing.
A half note

Dotted whole notes are not used often because that would exceed the value of a typical measure. You would find a dotted whole note in a 6/4 time signature or higher. Dotted sixteenth notes will go beyond the scope of most guitarists’ theory goals since it would add a 32nd time value to the mix and makes for some very complicated rhythms not often found in pop stylings.
Strum Down or Strum Up?
Most people can get the down strum pretty easily. After all, you are just going with gravity. Strumming up is usually more difficult to control, even more so when you are needing to evenly space your strums. The up and down motion of a typical rhythm needs to be even, as opposed to speeding up or slowing down your strumming arm when you reverse direction.
As stated before, strumming patterns that employ eighth notes will sometimes alternate, but not always. Rhythms that bring sixteenth notes into the mix will almost always need you to alternate your strumming direction. The best thing to start doing is to make sure you can do alternating strumming with slower eighth notes, gradually increasing the tempo of your metronome.
After that, you can find strumming exercises that will use various combinations of all of the time values. There are countless places out there to find strumming exercises like YouTube, guitarlessons.com, stringkick, GuitarLand, etc. My preference is usually to use a song as an exercise so you can learn the techniques in a musical way while simultaneously learning a song you like.
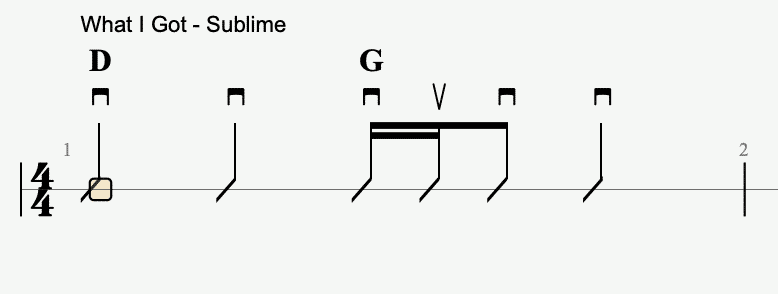
Below are some examples of simplified strum patterns of songs that I have used for beginner students. You can strip a strum rhythm down to its simplest form and build on it as you go. Once you master the rhythmic basics, you will be able to fill in the blanks and pretty soon you won’t ever need to write out a strum rhythm ever again. You will just be able to pick it up!
The symbols below the chords and above the slashes are the direction of the strum. The two vertical lines with the horizontal beam on top indicates a down-strum, and the “v” shape represents an up-strum.


*Going Deeper:
There are other “feels” within rhythms such as half-time feels or shuffles. “Half-time feel” slows down the strum to half speed without changing the actual timing of the overall song.
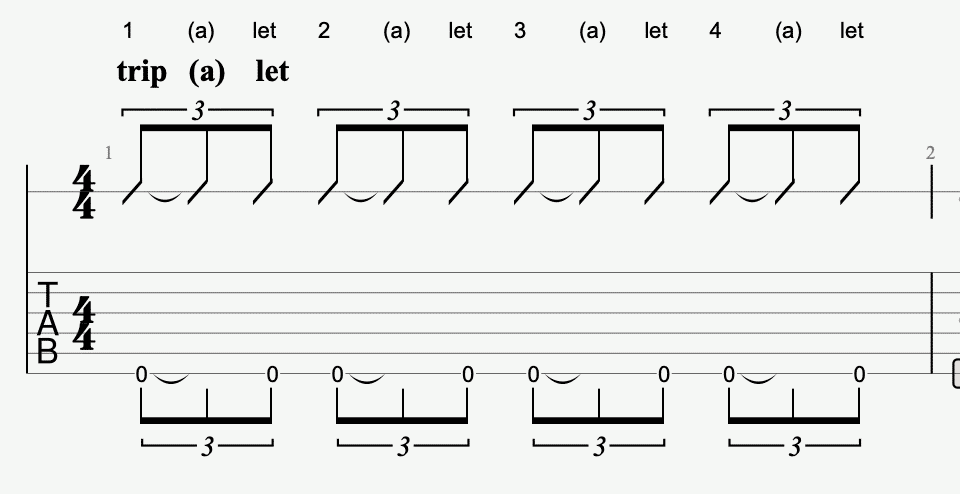
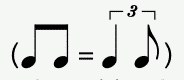
A shuffle is what is known as a “triplet” feel. Triplets are known as polyrhythms because you are playing a pattern of 3 against a count of 4 – two rhythms are happening simultaneously.
A triplet strum rhythm using 8th notes (the most common application of triplets) looks like this:

You can see here that the quarter notes (the first beat of each triplet set) alternate between up- and downstrokes. To play this rhythm, you will put the accent on every third strum to maintain the pulse.
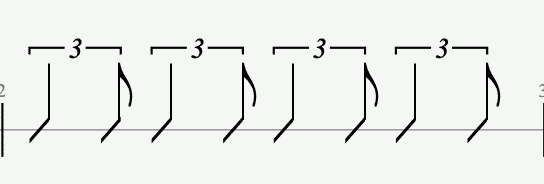
A shuffle uses just the first and third notes of a triplet set, omitting the middle beat which results in a sort of “staggered” sounding rhythm:
Having a rhythm written out this way is generally more difficult and confusing to read. Instead, the beginning of a piece of music will have a note at the very top to indicate a shuffle feel:
This way, the rhythm can be written out using the easier-to-read 8th notes and the player will remember that a shuffle feel is being applied to all 8th note strums.
For a great example of what a shuffle sounds like, one need look no further than the blues. “Red House” is a classic blues shuffle on the slower side.
The Power of Dynamics
The next step is to improve your rhythms with dynamics. Think about the way you speak. Your voice goes up and down, it gets louder and softer, you use inflection on certain words or phrases. The way you strum should be no different. The manipulation of dynamics will give life to your strumming and is absolutely essential to grooving.
Take the first song example above – “What I Got”. You have the rhythm, but if you simply strum with no dynamic engagement, it just won’t sound right. “What’s missing?” you may think to yourself. You need to be aware of several different things that are going on with the strumming hand. The first of which is this idea of “split strumming”.
You don’t always need to strum every string of the chord all the time. Sometimes, it will more appropriate to strum just a couple strings or even just striking the lowest note of a particular chord. With “What I Got” for example, that first quarter note will sound better if you focus your energy on the 4th string bass note of the D, then strum the highest 2 or 3 strings on the second beat.
With the G chord, you might pick only the 6th string to start out, then follow with a final strum on the highest three strings on beat 4. Now, you are starting to add some inflection to the chords that mimic that of a drum set. The “boom” of the low notes, followed by the pop of the high strings may remind you of a kick and snare.
Dividing your chords into low, middle, and high sections highlight the different parts of the chord that “sing” differently and provide a different energy. Sometimes, a full on strum hitting as many strings as possible is warranted! Other times, it’s good to pull back and save a little by strumming fewer strings.
Split strumming affects volume to a degree, but so does the weight of your strum. You can hit two strings really hard and it still be louder than a softly brushed chord using all of the strings. Experiment with different velocities of your pick.
You may also need to make adjustments to the angle of your pick. Listen to the difference between a pick angled upwards while you strum down versus a more perpendicular pick. Maybe it would sound better if on an up-strum, you slightly pointed the pick towards the floor. Try adjusting your thumb position of the pick hand to angle the pick sideways or flatten it out.
How much of the pick you use also plays a part in volume control. See what would happen if you choked up on the pick and used the very, very tip only and compare how that feels and sounds with more of the pick exposed.
How you grip the pick is also a huge factor in how hard you will be on the strings. Grip that pick with all of your might and it will be quite hard for you to play softly. Hold it like a baby mouse and try to strum big and loud and you’ll lose the pick!
Muting is also a great technique to implement. You can mute with your strumming hand resting way back on the saddle of the bridge to dampen the strings as you play. Palm-muting like this will provide a sort of “chug” on lower strings and a staccato click-y sound on the higher strings. Muting with the fretting hand is good, too. You can completely mute a chord to cut it short, or to add a couple of muted strums for a straight-up percussive effect.
When you become conscious of the dynamics you hear when you are listening to a piece of music, it will translate to your playing. You will then become more aware of your own use of dynamics to create a musical atmosphere that has some feeling behind it.
I can’t stress this part about strumming enough. The various inflections you insert into the notes you play and the chords your strum make all the difference in the world. I’ve seen so many beginner and amateur players struggle with this. If you aren’t paying attention to dynamics, the song you are trying to play won’t sound quite right and you won’t know why.
Spend some serious time and energy practicing your dynamic play and don’t be afraid to exaggerate. You need to explore the full range. Make your loud strums big and see how hard you have to hit it to make it buzz and sound a bit out of tune! Play so softly you can barely hear yourself, and everything in between.
Other Considerations:
Other than the way you physically approach the playing of your guitar, there are few other factors to be aware of. One of those is the natural tone your guitar has. If it is a smaller guitar, it might only get so loud. Your guitar might be thin-waisted and not have as much bellowing low end as a fatter jumbo guitar.
There are no doubt qualities of your acoustic guitar that you don’t really have control over. The part of the tree the guitars top is cut from, the guitar’s age, size, and shape aren’t really attributes you can change. Keep in mind that acoustic guitars all have different dynamic ranges and tonal properties.
With that said, the most important part of any guitar is its player. By working on the basic rhythmic aspects of music theory and meditating on all of the dynamic possibilities that are literally at your fingertips, you can learn to play any song and mimic the unique voice that makes that song you want to strum along to so recognizable.
Really study this part of your playing when you practice and put in concentrated effort. You do that and you will no longer really need to consciously figure out a strum pattern, you’ll just know it by listening to the song. Most of the pros have the ability to learn a song without even picking up an instrument. Ever wonder how they do that? Disciplined listening and intentional practice.
You must change the way you approach learning to strum a song on the acoustic guitar. I half-jokingly started telling students many years ago that there is no such thing as a “strum pattern” in a song. You are learning to play a rhythm; you are learning to play music. You are learning a song, not some mindless pattern! I’m not at all joking anymore.
Recommended Further Reading
If you enjoyed this article then I would recommend reading the following: