
Open up almost any Guitar Method 1 book, and you will find a page at the beginning showing how to hold a guitar and how to fret a note or chord. Depending on the publisher, there may be one or two pictures, a whole chapter, or nothing at all. Not all books will have the same information and they typically aren’t too terribly detailed because these books are usually designed to accompany an instructor.
Here, we will dive into various forms of sitting & standing posture, finger positioning for chords and notes, thumb position for the fretting hand, and more. I also want to talk about what is “proper” posture and where you should take liberties based on personal preference. However, there are some habits to avoid if you want to have crisp, clear notes and longevity of the fingers, hands, and your back.
Sitting
There are two seated positions for the guitar that are largely the most accepted. The “Classical” and “Rock” postures.
Classical
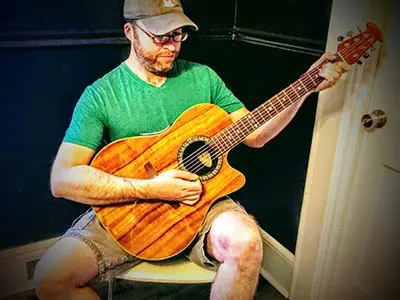
Here, the butt of the guitar rests between the legs with the neck angled upward. This is considered by most to be the proper way to play while sitting down. It helps to keep the wrist of the fretting hand in a more neutral position and the player will find that sitting up nice and straight is most comfortable, taking unnecessary strain off of the back and neck.
For added security and to take a bit of the load off the fretting hand, a strap is sometime preferred, but it is not required.
It is called the “classical” position because those who play the nylon-string classical guitars (or other small body guitars), particularly those who learn classical music will sit like this.
Another accessory that is often used is a footstool.

The player will rest the leg that is on the same side of the fretting hand (typically the left) in order to elevate the waist, in turn raising the neck and making it generally more comfortable to access the fingerboard. There are footstools that are specifically designed for guitar players, but you could just as easily use anything to elevate the leg. A stack of books, a concrete block, or a sleeping dog works just as well.
The benefit to the custom-made guitarist’s footstool is that they are very adjustable. You can adjust the height or even the angle of the platform on some to conform to the desired positioning for your foot.
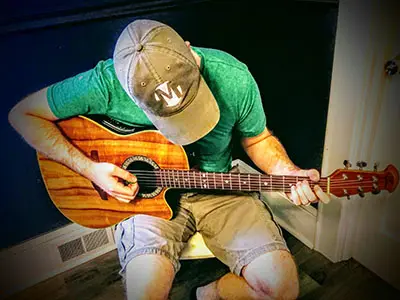
Rock Posture

With the “rock” position, the waist of the guitar rests on the same leg as the strumming hand instead of the fretting side. It’s important to keep the body of the guitar tight against your torso and it may help to have it at a slight angle with the body pulled back. Having the guitar more at your side than your front and keeping the guitar flat against your body and high up toward your waist helps keep the shoulders relaxed and allows your fretting hand to be mobile and flexible.
Using this posture requires a little bit more conscious effort to sit up straight. You may also find your neck tiring out if you look down a lot when you play. The tendency may be to slouch and almost drape yourself over the guitar and that can be bad for your back and neck, which is why you may not find many instructors actually advocating for the rock position.
This will cause all sorts of back and shoulder problems, and you will not be a very efficient player because you will be less relaxed. In this position, I am much more tense because I’m having to hug my guitar with my right arm to keep it from tumbling forward. Due to the length of my arms, this also causes a bit of impingement in my left shoulder due to the change in the angle of my elbow.
A good friend of mine has been a chiropractor in my fair city since 1984 and has dealt with many musicians. When I was a younger player, I had the bad habit of playing with the poor posture pictured above. When I went to him complaining of shoulder discomfort and a shooting pain going down my left arm, he was able to quickly correct my posture to avoid these problems.
In addition to this we have an extensive illustrated guide article, by Senior Physiotherapist Jeff Caulfield, that has an exercise plan for all guitarists before they start playing and provides preventative and treatment exercises for common guitar injuries here Best Stretching Exercises For Guitar Players – Illustrated Guide (Back, Neck, Hand, Elbow, Fingers)
There are two main differences between the classical and rock positions. The first is that the strumming arm can actually rest on the body of the guitar. The second is the approach of the fretting arm is completely different. Instead of being parallel with the neck, it’s perpendicular. Neither is superior to the other, it’s just a matter of personal preference and style.
A person who mostly strums or flat-picks will find the rock position preferable. If you are mostly into finger picking, you will probably prefer the classical position.
Standing
There a thousand ways to stand and play guitar. I really do not believe there to be a single “correct” way of standing and playing. There are bad habits, but they aren’t unique to guitar players. The same bad posture of slouching shoulders and curved spine when you are just walking around are just as bad, or maybe even worse with a guitar.
With a guitar strapped to your shoulder, that’s extra weight pulling down on you. If it’s a Les Paul, it’s a lot of extra weight! So it’s important to practice the same good standing posture of everyday life when you are playing guitar.
Pull your shoulders back, keep your chin up, chest out, and maintain a neutral spine just like you should be doing for your overall wellness anyway. That will translate to the stage. It may just take a little bit of extra effort because you have this foreign entity strapped to you.
Here are some steps to playing while standing that will keep pain away and make you a more effective player.
Head
Keep your head up so that your neck does not bend over too far just so you can see the fingerboard. Instead, focus on keeping your head in a position to where you can’t see the top of the fretboard, rather you want to be looking down at the side where the small inlays or “side dots” are along the neck.
Shoulders
Your shoulders need to be relaxed, not shrugged. If you have the guitar hiked up to high and you have to shrug your shoulders and flex your trapezius to accommodate the instrument, you are asking for neck and shoulder issues.
Knees
Just like they tell you at a wedding rehearsal, don’t lock your knees. Keep them slightly bent. If you are looking to perform on stage, this won’t be much of an issue because you will find yourself moving around and bouncing to the music so much that you won’t have time to lock the knees.
Toes
No, I’m not just adding this here so that I can cleverly complete the “Parts of the Body Song”. If you are using pedals, there are some important things here for comfort and practicality. Have a proper pedal board that has a slight incline. Choice of footwear can also be a factor. Dense boots make pushing the buttons easier and more narrow shoes help with accuracy with smaller pedal buttons and if your pedals are close together.
If you are the kind of electric guitar player that uses a Wah-Wah pedal (and I hope you are!), then my advice is to use the foot that is on your fretting side rather than your strumming side.
I started doing this years ago when I found out that my right leg on the pedal would cause the guitar to angle the guitar strings-up and that would make it much harder to fret. Using my “off” foot kept that from happening so I could manipulate the pedal without my leg moving the guitar around when I play.
Standing and playing is much more preference-driven than sitting down. We are all different, so there is not a “one size fits all” approach to this. A tall skinny guy with long arms is going to prefer his guitar to be much lower than, say, a shorter fellow with a bit of a belly.
Playing position is also dependent upon other factors such as music style and even personality, so therefore it is very, very subjective. To demonstrate this, let’s look at some our favorite guitar players and their standing preferences.
Tommy Emmanuel:
One of the best acoustic solo performers out there, Tommy’s positioning of his guitar has practical implications. I’m including a side-by-side of his sitting position as well to show what changes from sitting to standing to achieve the same goals of economy and performance.
In my experience, this is a great example of the most popular sitting and standing positions as a modern acoustic player. Tommy is a great example because he is such a physical player. His whole body gets involved when he plays and I believe that is vital, especially if you want to be an effective performer (publicly or privately). These postures allow him to engage his physical self; being loose, relaxed, and completely engaged in what he is doing.
When going from a seated to a standing position, the neck gets angled up more because the orientation of the body naturally changes a bit. The butt of the guitar also loses the support of the thigh and gravity has its way. Therefore, there are things that need to change about how you hold the guitar.
His guitar’s size, his style, and his energy require that he hold the guitar in a particular manner. Now, I’m not saying this is conscious decision on his part. Most of the time for a guitarist, it’s not. A lot of the time, standing posture is about how to produce the sounds you are after while maintaining a certain amount of energy for an audience. Not to mention, when you are playing for hours on end multiple days per week, you need something comfortable and sustaining. It seems to be working pretty well for ol’ Tommy.
*A Quick Aside
Let me pause here to say this is why most instructors and classically trained players prefer the classical sitting position. When you stand, the orientation of the guitar doesn’t change very much at all, making the feel of the guitar much more consistent between the two forms of playing.
However, as a long-time performer, there are limitations to the classical position because it’s very difficult to engage your body in your playing if that is your style. Most classical players don’t dance and bang their heads. That’s okay because they have more important things to worry about. But there’s no way the classical position would allow Tommy to “get into it” as much as he does and thereby play like he does.
Let’s move on to electric guitar because you may be starting out here, or one day hope to get an electric. With the body being thinner and typically a little heavier, adjustments may need to be made. Usually, this results in a slightly lower strap position since now the strumming arm is brought closer to the players torso. It can be decidedly uncomfortable to play an electric up too high as you would need to shrug your shoulder to access the strings with your pick.
Steve Vai and Joe Satriani
These two gentlemen have different physical body types, but their guitars are in similar places in relation to their abdomen. The body of the guitar, specifically where the pickups are located, is right around the belt line. This is also the most preferred positioning for the electric guitar for comfort and playability. The reason you see guys like this with the guitar in the same place on their body is that it makes for better overall mobility on stage and is much more comfortable for long hours.
Now, the reason I put these guys next to each other is because although the guitars are virtually in the same place at their hip, you’ll notice it still fits them differently. With Vai, it’s as if the guitar is actually higher because his arms are longer. Satch has to stretch his right arm out a little more, but that works for his style because he is more rock-driven, playing big, fat, powerful chords. Vai’s guitar position helps his arm be in a more optimal place for his particular brand of wizardry.
Slash
This guy tends to play with the body a tad bit lower with the body of the guitar more at the upper thigh. I have played Les Paul’s before, and I naturally find myself playing in about this same position. The biggest difference between Les Paul’s and other guitars such as Ibanez models is the neck of the Les Paul is much heavier, so you will find your fretting hand being weighed down a bit more.
Notice that the right hand of Slash is not terribly lower than Joe Satriani, but the left hand is significantly lower. This is a prime example of how guitar type can play a role in how you carry yourself while equipped with the axe.
Tosin Abasi:
This is a unique example, but certainly worth noting as the underground metal scene is so hugely popular these days. This guy plays his electric up higher than most, but there is a very good reason for that. Not only is it because of his style, but the fact that his guitar is an 8-string.
The body is bigger and the neck is so much thicker so the guitar needs to be hiked up further to allow for easier, more comfortable access to the neck and strings. The picking and fretting radii are much wider and if you have a guitar like this, you need to take that into consideration as you will need to have a wider range of motion. It’s pretty tough to do that if you have the guitar at your shins or conversely at your throat.
Victor Wooten:
Okay, so I’m throwing in a bass example. It’s still a guitar and there are things you can learn from bassists that carry over to steel-string guitar. Victor prefers his bass to be in the same position standing as it would be if he were sitting. This is actually what most people find to be the most comfortable way to play, whether it’s bass or guitar.
Contrast that with dUg Pinnick of King’s X:
This guy keeps the bass at his freaking knees. With his freakishly long arms and the style in which he tends to play, he can get away with playing that low. Some may scoff at this practice as being unsustainable, but the dude is pushing 70 and still touring. As of this writing, he is just down the street from me for the Experience Hendrix tour. I’d say it’s worked out just fine for him.
So let me reiterate that as an instructor and a seasoned player, I truly believe standing posture and position to be very important, but subjective. The positioning will also vary based on instrument type and size. Here are the most important things to consider when playing while standing:
- Be able to play your notes and chords in your style as (or nearly as) effectively as you can when you sit.
- Play in a way where you will be physically comfortable for long periods of time.
If you can do both of those things, then don’t let anybody tell you that your strap is too high or too low.
Hand Position
Now that we have looked at the standing and sitting postures, your hands are next on the list. This is where the magic really happens. Whether you stand or sit, hike up your guitar to your chin or drop it down to your ankles, the real goal here is to make sure your hands are able to do what they need to do to play the way you want to play.
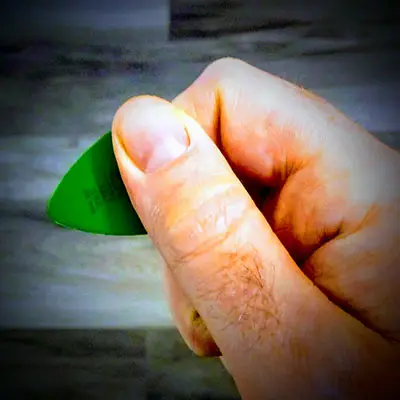
Let’s start with picking/strumming hand, particularly the ways to hold a pick. What I will start with is what is considered to be the most productive way to hold a pick. The purpose here is to keep the hand as relaxed as possible while keeping the pick secure and safe from being dropped.
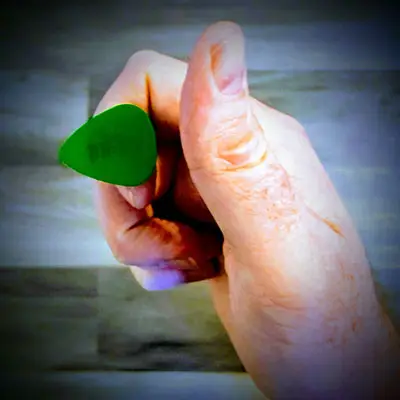
Start by having the pick on the first knuckle of the index finger. For me, I like to have it on my finger in such a way that I can balance it without it falling to the floor.
Next, I just place my thumb over top of the pick. For me, what this means is that I really don’t have much of the pick exposed on the top side. My personal preference is to be able to move the pick around as needed depending on how I’m hitting the strings.
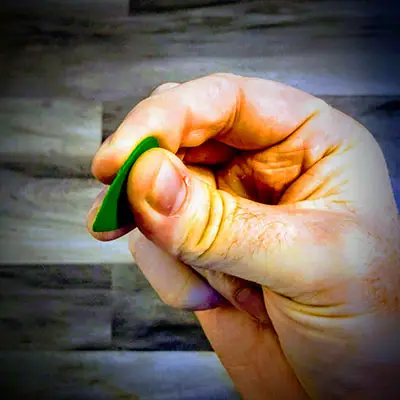
Keeping the hand relaxed and the thumb flexible allows me to change the orientation of the pick for various technical tasks such as pick tapping, pinching, hybrid picking, or hard strumming. If you want more of the pick exposed, just pull the fingers in toward the palm.
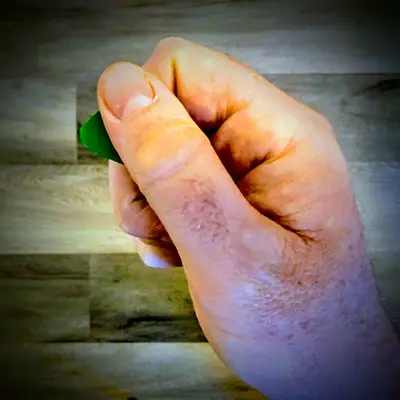
Although there are very good reasons for this being the preferred way by most to hold the pick, it’s not the only way. For example, head back up and look at the picture of Tosin Abasi. For some players, pinching down on the thumb is more conducive to their style.
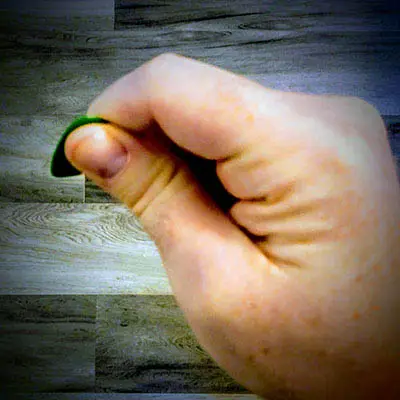
The change in pick angle will result in tonal changes when you hit a string. The steep angle of the pick can also help with techniques such as tremolo picking or sweep-picking, something Abasi is very well known for.
I once knew a guitar player in Chicago who held the pick with both his index and middle fingers. Sometimes, he would just use the middle finger as opposed to the index finger. While not the most comfortable for me, he makes a pretty good living playing his guitar this way, so I’m certainly not going to say he’s wrong!
Just like with posture, the idea here is to find what works best for you. You need to go with what is comfortable and efficient and sustainable. If you can check all three boxes, go for it.
On the fretting hand, there are certain practices you need to employ to attain maximum clarity and sustain in your notes and chords. When making a chord, each note needs to have its own voice. Fingers that are not positioned properly will mute other strings or hit a stray fret, completely screwing up your chord.
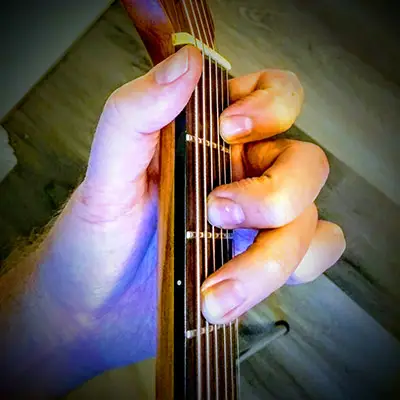
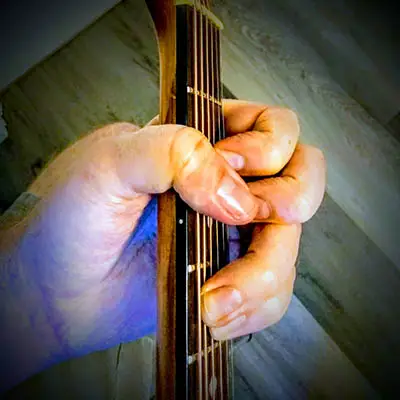
Make sure the fingers are standing up with a nice arch. This way, you are getting the very tip of the finger down on the necessary note and that gives you more stability and strength.
Keeping the base of the fingers close together as opposed to spread out really helps to achieve this level of effectiveness. The fingers are much stronger when they are together than when they are apart.
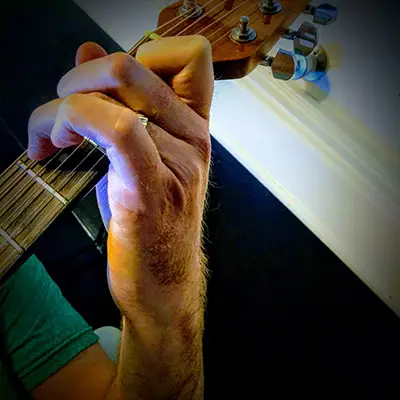
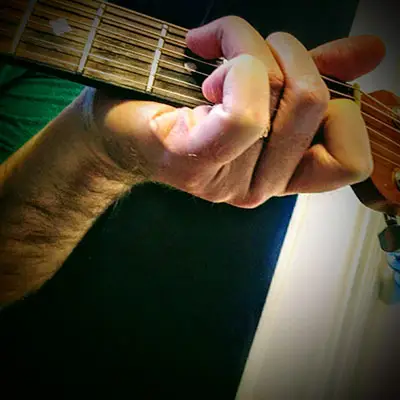
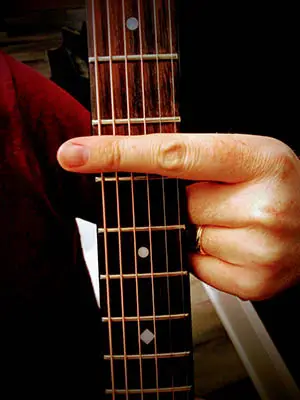
What you don’t want is the hand to collapse and thing fingers to lay down across the strings. The reason why most beginners have a hard time with the C-chord (as pictured above) is they are focusing too much on the wrong part of the hand. The place where you derive a good deal of your strength for a chord is in your thumb muscle.
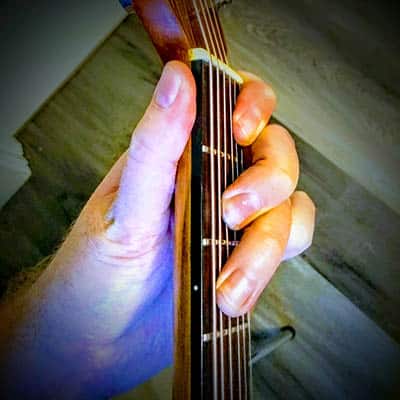
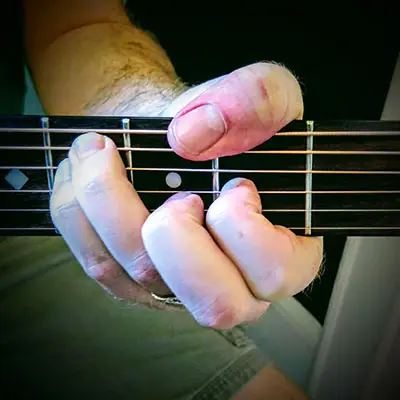
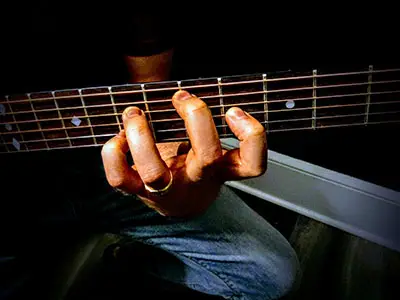
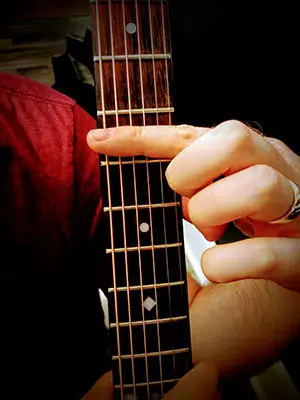
Look closely at the thumb in the first chording example and the next one at the same angle. In the first, the muscle in the hand directly below the thumb is rigid and secure. In the second picture, the thumb is not doing much. It has been taken out of the equation because the muscle below the pinky is doing more the work causing the fingers to then lie down rather than stand erect.
Speaking of the thumb, we need to talk about this particular digit. It is of vital importance and I’m shocked at how few instructors teach its value. After all, the opposable thumb is a huge advantage we have over other mammals.
The thumb is not some passive player in this game. It’s actually doing quite a bit. As I mentioned before, the majority of the guitarists fretting strength comes from the thumb and the muscles by which it is controlled. A brief anatomy lesson is helpful here.
There are eight muscles that control the thumb and you probably had no idea they existed. Of those, there is one in particular that will serve you well. It the adductor pollicis. This is the muscle that runs from the base of the thumb down toward the wrist on the inside of your palm. It’s primary function is providing pinching power, which as a guitar player helps in the squeezing process of making a chord.
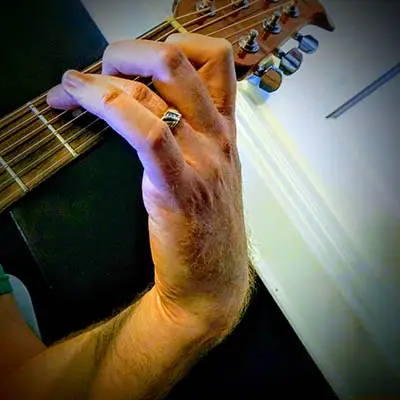
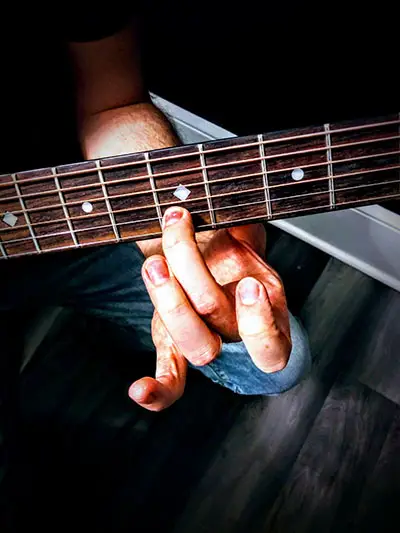
You will need to play around with different thumb positions to achieve certain chord positions. For example:
In this chord, it may be best to hook the thumb around the top of the neck about where the middle finger is in order to have a good distribution of power for all three fingers.
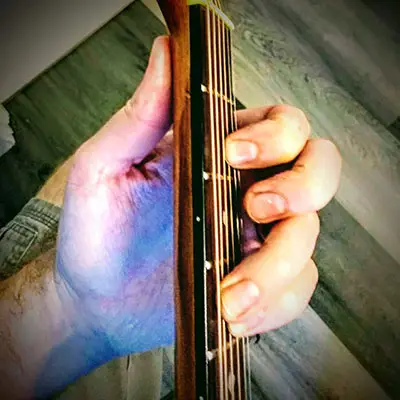
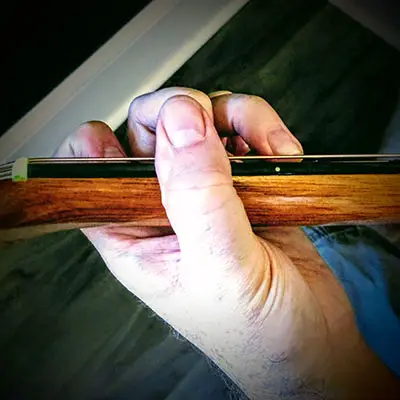
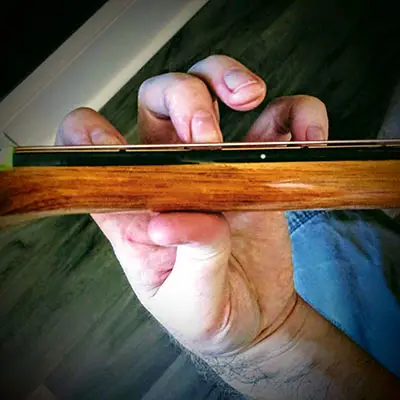
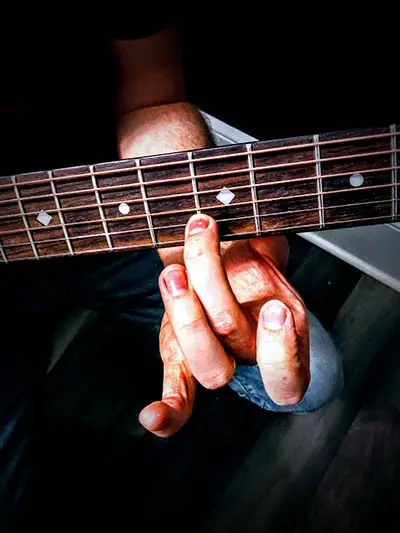
There are some chords that need the assistance of different hand muscles like the ones found on the outside of the hand below the little finger. In the above F#7sus chord, the third and fourth finger are doing more of the work, so in order to employ the best muscles for the job, the thumb may need to move to being in a parallel position.
A different formation of the same chord may require the thumb be used as a fretting aid, not just a stabilizer. For this, the thumb will wrap around and grab the low E string to fret a bass note while simultaneously providing squeezing power.
Stretchy chords will need the thumb to move more toward the center of the palm. Now here is where genetics come into play. I have a hitchhiker’s thumb. For those who don’t, you may find that you need to not only reposition your thumb, but really pay attention to your wrist.
The wrist plays a big part in chord making as well. The more you drop the wrist to the floor, the easier it will be to spread out your fingers to make stretchy chords or to move the hand away from the bottom of the neck to clear the way for the higher strings. You will want to be careful how often you play in the position as it will strain the wrist with prolonged use, resulting in tendon and ligament issues.
On the opposite end of the spectrum is elevating the wrist up so that the palm is up against the bottom of the neck. This can be helpful when you need extra power for the ring finger in particular, but this will not be a common occurrence for most players.
I see most beginners using this wrist position because of the way the hand is usually “trained” to grip. The problem this creates is that you will end up with muted high strings. When you go to make the C-chord, the high e and b strings will be muted by your hand. Prolonged use of this position can also cause physical ailments in the wrist.

By far, the most superior wrist position for most chords is a neutral one. Here, the hand and forearm are completely parallel to one another because the wrist is not bent in either direction. This is a more natural position for the hand and will help you remain more relaxed thus allowing you to make better sounding chords.
Getting The Balance Just Right
In my experience most amateur players tend to only go with what is comfortable. Comfortability doesn’t always mean you are doing it correctly. If the way you play is comfortable, but it makes it more difficult to get a good sound or clear chord, you may need to make an adjustment. Being uncomfortable doesn’t always equate to being the wrong way to do it. You may just need to strengthen a particular part.
Likewise, just because something is effective doesn’t mean that it’s best way to play it. You can go with what is most efficient and effective to get achieve a certain feat, what is best for theatrics, or just what you feel is “easier”. However, you may pay for it with pain which could lead to chronic issues down the road. This is a mistake. I had a close friend who played his guitar in a certain way because it looked cool. He went on to play professionally and continued certain bad habits he never corrected. Unfortunately, this led to very early arthritis and it effectively ended his musical career.
Finger Placement
This is another part of playing guitar that is all about small details, but it can make a big difference in your playing. The part of the finger you use to fret notes is very important and you will need to experiment with this as much as anything. Do you use the part of the finger tip closest to the nail? Do you go more towards the pad of the finger as if you are submitting a fingerprint? The outside of the finger? The inside? The answer to all of these questions is yes.
For most open-position chords (C, A, G , E, D, etc.) you want to start out by trying to use the very tip of the finger as close to the nail as possible.
By focusing on that point of your finger, you will help your fingers to stand up straight with a healthy arch as mentioned previously. It may sound silly, but try to imagine your finger coming to a point. You know, like Robert Patrick does in Terminator 2 only less deadly.
The natural angle your hand makes when approaching the neck typically causes this particular point of contact to be slightly on the side of the finger tip that is opposite of the thumb.
As you grow your chord vocabulary, you may notice that different chords may require your fingers to use the other hemisphere of the finger tip which is on the same side as the thumb, so don’t be surprised if you start to develop calluses, but then newer chords start to make your finger tips hurt in different places.
As for the position in relation to the fret, you need to be about as close to the intended fret as you can get without touching the fret wire.
If you are on top of it, the note will be muted or muffled.

Too far away and the note will likely buzz because the further away you are, the more pressure is required on the string for it to sit against the fret.
Barre chords will be a little different because you are no longer using the finger tip, but the underside of the finger, typically the index. When barring a chord that involves the index finger going across all six strings, it can be a challenge to fret all the notes you need.
The undercarriage of your finger is not flat. It is very irregular with valleys on the finger’s anterior, making it very difficult to apply even pressure across the strings.
For this reason, you will find it beneficial to roll your finger slightly to its outside (toward the thumb) to use the side of the finger where it is more flat.
When you barre, it’s important that you change your mindset when fretting in this manner. You are no longer wanting to focus on the tip of your finger. Instead, you are using your thumb to pinch the neck behind it and push down on the middle knuckle and make your finger as rigid as possible, pointing straight up into the air.
Final Thoughts
There are certainly some practices and habits that most agree to be “proper form” when it comes to posture, hand position, and finger placement. With that said, I don’t find it very valuable to overthink it. I know that may seem hypocritical since I just wrote a lot of words about the subject, but let me explain.
Going back to what I eluded to earlier and elaborating a bit, you need to be able to check all of these boxes when it comes to the way you play:
- Comfortability
Some pain is good and unavoidable. It will go away as you get in better shape. The things you want to avoid are things that will cause chronic issues like tendonitis, impingement, or inflammation. If it hurts and never gets better or gets worse, see a doctor and do something different.
- Efficiency
You need to be able to make good, clear sounds with your notes and chords with as little movement as possible. Relaxed positions resulting from a neutral wrist and spine are two of the biggest keys to achieving this.
- Effectiveness
Can you clearly hear each note and are you able to fret all of the notes of a chord that you need? It’s important that you are getting the sound that you want out of a chord or note and your posture has a lot to do with how effective you play.
If you can’t sign off on all three of these, then something needs to change. You may not be able to rate all three categories a 10 out of 10 every time, but you can get close. You don’t want to find yourself in a place where you are sacrificing one of these areas for another. However, you may find it to be a balancing act.
Playing with guitar higher up may make it easier on the left hand, but your right shoulder gets really tight after a few minutes because you have long arms. You may have to compromise and get to a place where you are physically comfortable, but it’s a little bit more difficult to make that chord. That’s okay because it’s easier to get better at chording in that position than it is to change the length of your right arm.
This is about trial and error for the most part. Stick to the rules of good posture in everyday life and make the needed adjustments for your unique needs and goals. When in doubt, consult a good teacher who is a seasoned performer to help you. These guys are the personal trainers for guitar players and will be invaluable to you skill development and longevity.