
By now, you may be familiar with – or at least heard of – the CAGED System. CAGED is a five-pattern system based on the chords C, A, G, E, and D (major) with the idea that these chord shapes are repeatable up the entire length of the neck in order to better learn and memorize chords.
Not only does CAGED serve to give guitarists a pattern to work from, but it also increases chord and neck vocabulary by giving up to five different possible positions for a single chord. It really is the best way to learn chords and the notes on the fingerboard.
I have used CAGED not only to teach students but to advance my own playing. I still use it to this day when transcribing or creating music. If you are not familiar with CAGED or how it works, check out our article here What Is The Caged System? which provides a full introduction to the CAGED System.
Once you are familiar with the basics of how the five-pattern CAGED System is set up, now it’s time to start putting it to work. This is where the magic happens. It really is fun to discover that every single chord you could possibly play is traced back to one of these five shapes. As with any instrument, once your mind identifies this pattern, you have that musical breakthrough and your playing reaches new levels at breakneck speed.
Before the exercises, I recommend learning some basic theory to really get a handle on the CAGED System for learning chords. This is optional, so feel free to scroll right down to the exercises. But if you take the time to learn these very basic ideas, you will learn the musical language and make big strides in your guitar learning much quicker.
Here are the three ideas I recommend learning:
- Know the entire neck
- Learn the major scale
- Harmonize the major scale
Knowing the Whole Guitar Neck
Learning the notes on the neck is very important for any guitar player whoever wants to self-teach. It’s important for any aspiring guitar player who wants to become remotely serious about playing, but especially so for one who wants to bypass a formal instructor. I suggest you start learning the notes if you want to get the most out of the CAGED System and be a master of chords.
There are natural notes and accidentals (sharps & flats). The natural notes are separated by a distance of one whole step which translates to two frets on the guitar. There are two exceptions to this: B-C and E-F which are only a half step apart, or one fret.
Between these natural notes are the accidentals. Sharp notes will have a flat “synonym” known as the enharmonic equivalent. In other words, F# and Gb are the same pitch. C# and Db are the same, and so on. As per our natural note distance exception of B-C and E-F, there is no actual* B# or Cb, nor is there an E# or Fb.
*There are times where a piece of music will have E# or Fb, B# or Cb written as a means of making sheet music easier to read. For more about this topic, see the book “Music Notation” by Gardner Read
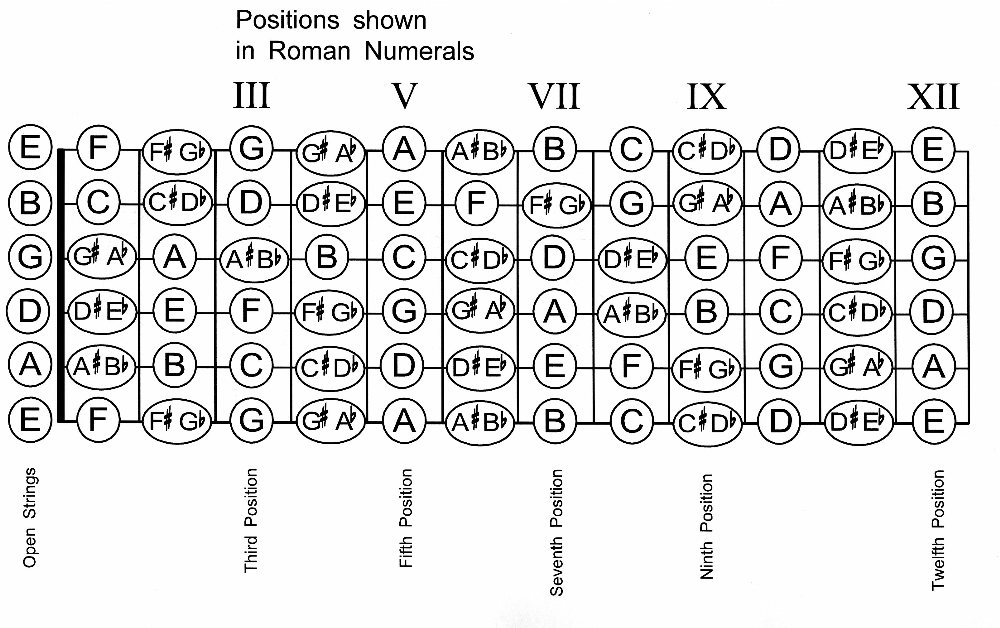
It is important also to know what a position is on the guitar. When we speak of open position, first position, second position, and so on, we are speaking of the location of the lowest fretted note(s) being played. In the open position, the open string is the lowest note location. In third position, the lowest fret being utilized is the third fret.
You may notice these positions are landmarked by the inlays on a guitar. The inlays on the fretboard (in most cases, dots) are located on the third, fifth, seventh, ninth, and twelfth frets. These serve as visual references when traveling up and down the neck, so be sure to learn what notes on the inlay frets.
There are twelve available notes – seven natural notes and five accidentals. So it would stand to reason that at the twelfth fret, the musical alphabet of each string starts over. In other words, the notes on the twelfth fret of each string are the same note as the open string, just an octave higher.
If you think of the number of frets and strings multiplied by the number of notes, it seems like a tall order to memorize 72 frets of notes. However, as with anything, it doesn’t need to be that complicated. Learn instead the location of the natural notes. Even simpler, memorize the open string notes and just use the rule of two frets between notes with the B-C and E-F exceptions.
With just knowing those 6 stings and the formula, you can locate any note you want quickly, and you will begin to memorize the notes’ locations in reference to the inlays the more you practice this. The key to memorization is to have a system!
The Major Scale
The major scale is the foundation of all western music. It would behoove a guitar student to learn the basic idea. A major scale is made of seven notes which can be combined, or harmonized, to create chords and organize music into “keys”. Since there twelve notes in our musical alphabet, that means there are twelve possible major scales and twelve possible major keys.
Again, if we use our way of thinking when it comes to memorizing the notes on the neck, the learning process will be simplified. Rather than memorizing twelve major scales, learn just one formula, then apply that formula to a key.
The major scale formula is written out in terms of the distance between the notes which will either be whole steps (W) or half steps (H). The major scale pattern measures as follows: W-W-H-W-W-W-H. Two whole steps, a half step, three whole steps, then a half step.
These are called intervals and the intervals create a formula. Starting with a “root” note or a “1”, the intervals are major 2nd, major 3rd, perfect 4th, perfect 5th, major 6th, and major 7th. The scale then wraps up with a higher root note known as the octave.
More simply written out, it’s R – II – III – IV – V – VI – VII – Oct. The root can also be written as roman numeral I. If we apply that formula to the key of C, the notes are as follows:
C (W) D (W) E (H) F (W) G (W) A (W) B (H) C
The notes C-D-E-F-G-A-B make up the C major scale. Musical students typically start learning this scale first because all seven notes are the seven natural notes, so there are no sharps or flats. Let’s apply this formula to a couple more keys: G major and D major.
I – II – III – IV – V – VI – VII – Oct
G – A – B – C – D – E – F# – G
D – E – F# – G – A – B – C# – D
Harmonizing The Major Scale
“Harmonizing” is just a fancy musical word for “combining”. When a scale is harmonized, notes are combined in order to make a chord. To make a full chord, you need at least three notes from the scale.
A major chord has the following three notes: the root, the major third, and the perfect fifth, or I – III – V. Apply this formula to any key, locate the notes on the neck in a particular position, and voila! A chord is born.
I – III – V
C – E – G C major
G – B – D G major
D – F# – A D major
To continue the harmonizing process, a scale is fully harmonized when each of the 7 seven intervals have been made into chords using the other notes of the same scale. Without going too in depth into this portion, here is a brief illustration of what this looks like.

Each degree of the scale, when using the every-other-note formula, creates a chord. This harmonized scale is now a chord scale.
So in a given key, there are seven possible chords. Each of those chords can be expanded on to create many more variations, but this is the basic structure of a key:
R (major), ii (minor), iii (minor), IV (major), V (major), vi (minor), vii0 (diminished).
There is actually a lot more one can dive into with the idea of harmonizing a scale, but this really is as far as any guitarist needs to go to become a great guitar player who can teach themselves just about anything. Feel free to dive into these subjects even more on your own, but we have enough here to be able to dive right into the CAGED System exercises.
CAGED System Rundown
Before we jump into the exercises, here is a brief reference guide to the five major patterns and their minor counterparts.
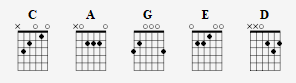
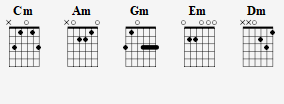
The major shapes will be the primary focus of our exercises as not all five of the minor shapes are as transferrable up the neck, at least not in a practical sense. For the minor chords, one can stick to the Am and Em shapes and be able to account for any minor chord. I’m a guy who likes options, so we will explore more advanced chord options for minor chords as well as the major chords.
Remember – all chords, no matter how advanced in their structure, are based on these simple shapes. You will see that these exercises will help make the chord world so much more accessible and less overwhelming.
Exercise 1: Get To Know The Shapes
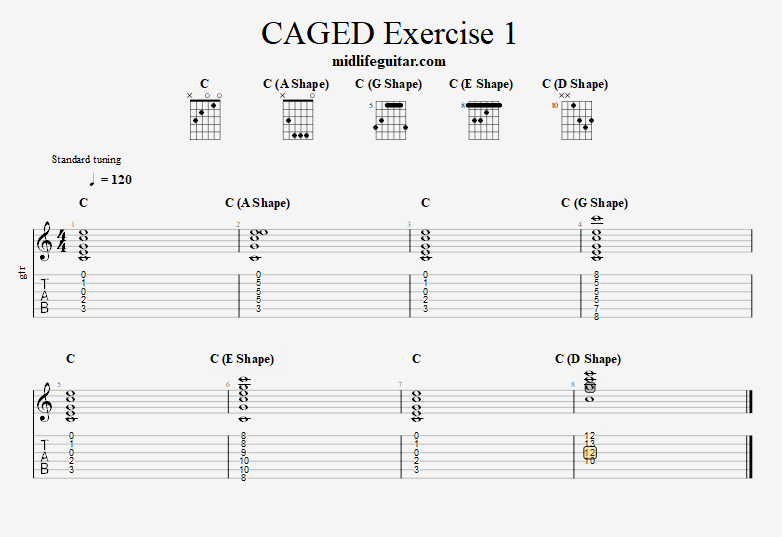
In the first exercise, the idea is to take each chord and move it up the neck using the other four chord shapes. The above example uses the C chord. This is a “workout” type exercise where the idea is not so much a musical piece, but an etude of sorts to work out your agility and precision.
Take the original C chord and go back and forth with each chord shape. After playing the A-shape for C, go back to “home base”. Hit the G-shape, then back to open C again. This works out your ability to change chords and move with efficiency up and down the neck.
The trick is to plan ahead. Don’t think about the chord you are playing, think about the one you are playing next. Visualize the chord shape in the next position on the neck, mapping out in your mind where your fingers will go. Once you have that mental picture, make the change.
Do the same with the remaining open position chords. Here is what it looks like for the A chord:


Congratulations! You have now turned five chords into twenty-five chords. Quintupling your chord vocabulary in a single workout is not too shabby. That’s the power of the CAGED System.
Hang on. Not done yet.
Exercise 2: Simplify The G Shape
Some of the chords from exercise one may feel awkward. That’s okay because chords can be abbreviated or altered to make for a more guitar-friendly chord. In this exercise, the point is addition by subtraction. Take away a few notes to simplify the chord for a better feel and, in some cases, a better or different sound.
For example, the G shape can be cumbersome to make because one has to compensate for the open strings by barring across the fourth, third, and second strings with the index finger.
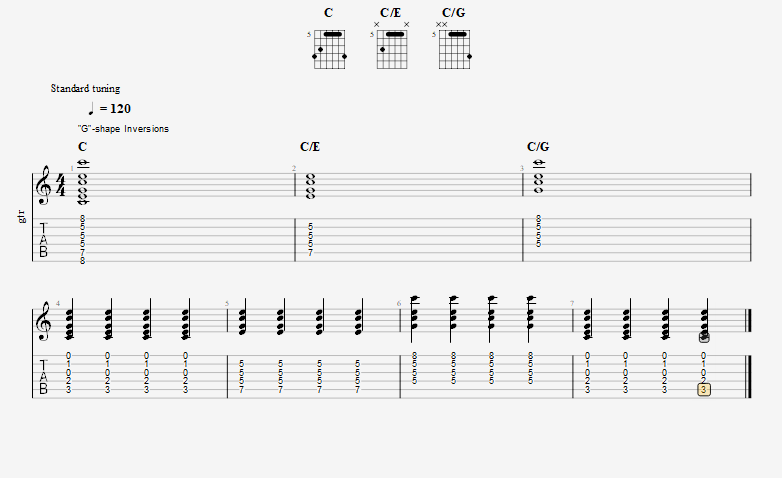
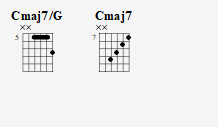
A simpler way to make this shape sort of combines the G and A shapes to create inversions. An inversion is simply a chord where a note other than the root note is used as the bass note. With the G shape, one can omit the 6th and 1st strings to create a C/E – a C chord with E as the lowest note known as a “first inversion”.
The player can also use the high notes, omitting the 6th and 5th strings to make a C/G, also known as a “second inversion”. In these two shapes, you can see how the G and A shapes overlap.
A good exercise is to create something musical with these chord shapes. In other words, create a miniature song using just one chord, with these inversions.
Exercise 3: Simplify The D Shape
The D shape can be exercised the same way the G shape can. Just like with the G, taking the D shape and moving it up the neck verbatim can feel a little clunky. The D shape can be used as an inversion by incorporating the 6th string, or by combining the D and C shapes as seen in the third measure of this exercise.
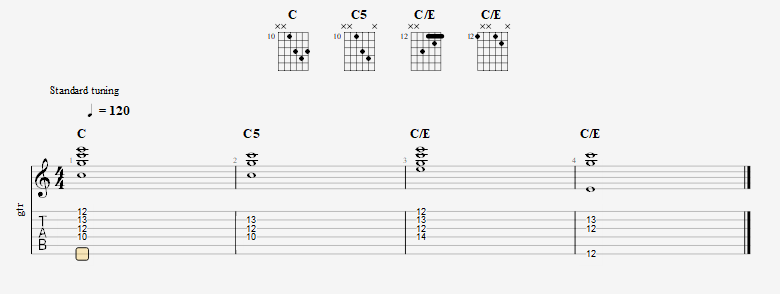
The C5 is often used in the context of the electric guitar to get to the upper ranges of a chord with minimal notes for a cleaner, more straight forward sound.
The trick with making these chords work in a musical context is to effectively mute the notes that are not being fretted. Use non-fretting fingers to drape over the strings, muting those that are open and controlling the sound of the chord.
Exercise 4: Minor Chord Shapes
Minor chords don’t always translate up the neck in the way the major shapes do, but this exercise is a good starting point.

The two cords in particular that are used most often are the Am and Em chord shapes. Simply move them up the neck, barring across the strings in order to fret the notes that compensate for the open strings.
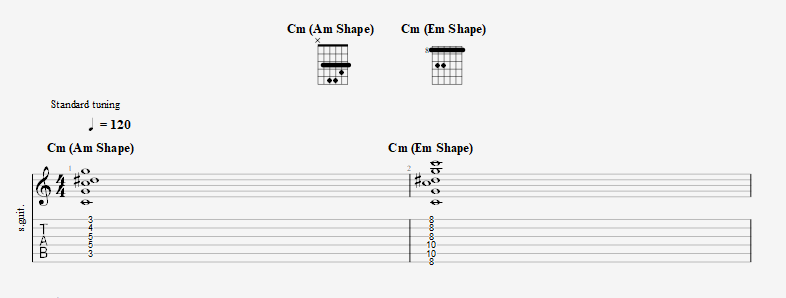
The root note for the Am shape is located on the fifth string. Whatever note is being fretted on the 5th string, that will be the key of the chord. The Am chord shape played up a full step to the 2nd fret is the Bm.
The Em shape has its root on the sixth string. So you can see the importance of at least being able to locate all of the notes on the 5th and 6th strings. Just knowing the notes on these two strings will allow you to properly locate both major and minor shapes for the A- and E-shaped chords.
Knowing the other shapes will open up additional possibilities.

Taking the open position Cm and moving its abbreviated form up the neck reveals a really cool alternate way to play Em. Since the open 6th, 2nd, and 1st strings are all within the key of Em, the player doesn’t have to worry about muting the open strings. Another way to fret this would be to omit the fretted note on the 3rd string and use the open G string.
Get creative here and try to find other ways of moving these open position minor shapes up the neck.
Exercise 5: Chord Variations – 7ths
Creating a new chord voicing can be a simple as adding or subtracting a finger, or by moving a single note. This is how one can discover different chord tensions such as 7ths or suspended chords.
Major 7
Major 7ths (maj7 / M7 / 7M) add the 7th note of the major scale to the chord equation. Whereas a C major chord contained the notes C, E, and G, C Maj7 adds the B note. Here is CAGED Major 7:

As a chord is moved up the neck using the CAGED System, awkward chords may need a bit of a transformation.

Feel free to experiment with variations on these shapes:
Dominant 7
The dominant 7 chord is a major chord (1, 3, 5) with an added minor 7th (1, 3, 5, b7).
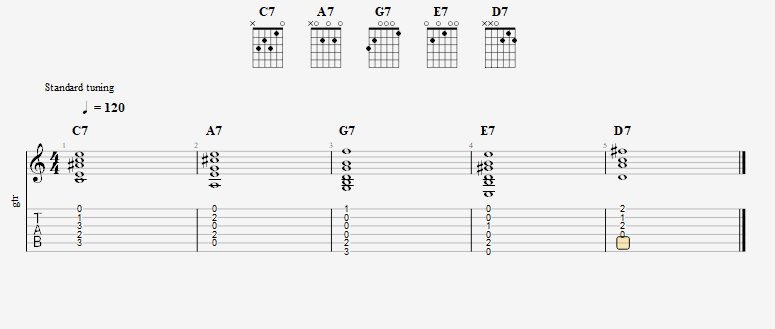
And here is how it moves up the neck:

Minor 7
The minor 7 chord (m7) is a minor chord (1, b3, 5) with an added minor or flat 7. Refer back to the minor chord shapes. In the case of “C”, the flat 7 is a Bb so we will just add that note to the chord.

When it comes to minor chords with the CAGED system, there are really two main shapes that are used – the Am and Em shapes. The other shapes can provide some interesting voicings and pave the way for more complex chords, but the Am and Em are what most of the minor chords are based on.
Take Gm7 for example. That shape is the Em shape. Given the nature of the guitar and how the strings are tuned, these two chords share a shape.
I really hope this exercise guide serves you well as you work on the CAGED System. There are many more techniques to practicing this system and many other chord variations that can be added to your chord vocabulary.
The key to exercising and practicing this system is to work on one thing at a time. If you are typically practicing 5-7 days a week for 20-30 minutes at a time, spend a week on each exercise. Don’t overload yourself. If you are a little more proficient and you spend an hour or more per day, try working on each exercise for an hour.
Focus, practice slowly and deliberately, use a metronome. Now, watch what happens with your chord vocabulary!