
* Disclaimer: The content of this article is for informational purposes only. It is not intended to be a substitute for professional medical advice, diagnosis or treatment. *
**If you are looking for accessories that can help you with guitar pain including back, neck and shoulder pain then read our article here on the 10 Best Accessories For Guitar Players With Back, Shoulder & Neck Pain.**
This article, by Senior Physiotherapist Jeff Caulfield, will focus on injury prevention, the most common injuries guitar players experience, ways they can be managed and a complete stretching routine to minimise your injury risk and maximise your play time.
Playing the guitar is undoubtedly demanding; physically, mentally and emotionally.It’s fair to presume that every guitarist, whether they strum acoustic, shred electric or slap the bass, has been guilty of over-indulgence in their passion and/or improper technique.
Unfortunately, if you continuously repeat these enduring sessions, sore fingertips are not the only thing you’ll fret about. Playing for extended periods of time, combined with improper technique, can lead to discomfort, pain and injury. But fear not! We have put together a complete guide to pave the way on your pain free road to rock.
Rather than waiting for an injury to strike, there are a few measures you can adopt to keep you fit to play.
Correct Posture
Poor posture is the number one leading cause of injury when playing guitar. It creates unnatural muscular tension that, when combined with complex dexterous finger movements and held for long periods, can cause microscopic injuries in soft tissues. This can lead to inflammation, swelling, numbness and tingling, nerve impingement and severe pain.
It’s rare for these injuries to develop in a short period of time or during a single session. They usually result after many hours of improper practice. However, beginners should be wary. Adopting these strained postures for long periods, when your body is not used to them, can quickly result in injury.
Whether you prefer playing seated in a classical or rock posture or choose to stand, the tips below can help minimise your risk of developing a postural related injury.
Neck
Keep your head up with your chin tucked, rather than poking forward. A good reference is to keep your ears in line with your shoulder joints. Many beginners struggle with this as they feel the need to look at their fingers when practicing new chords. The faster you shake this habit, the better. If you find it difficult, try glance at the top of the fretboard (where the dots are) during difficult sections, rather than the front. You will get some reassurance that you’re fingers are in the correct position without compromising your neck position.


Shoulders
Keep your shoulders relaxed. Try not to overthink this but, avoid raising your shoulders towards your ears while playing and try to keep your shoulder blades back. Personally, I find this particularly difficult when soloing or picking individual notes, rather than strumming.


Back
Slouching is the enemy here. If you continuously slouch when you play, I can almost guarantee you will experience neck or back pain. Keep your back in a neutral posture.

Slouching is the enemy here. If you continuously slouch when you play, I can almost guarantee you will experience neck or back pain. Keep your back in a neutral posture.

As mentioned above, avoid the temptation of peering over your fretboard. If you need to glance at it during particularly difficult sections, turn your head and look down, rather than flexing your spine.
Try to alternate between sitting and standing. When standing, use a wide, comfortable strap to ensure the load is evenly distributed.
Arms

You may observe guitarists playing with their elbows raised or arms out away from their body.
This is incorrect and should not be emulated. The further your arms are away from your body, the larger the load and the higher injury risk.
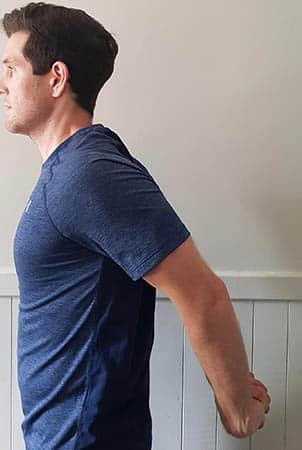
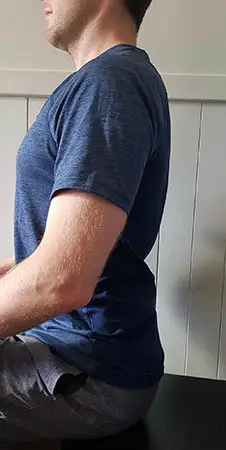
The elbow of your fretting hand should stay close to your body, but not lean directly against it.
Your picking elbow should come around the front of the guitar and remain close to the body of the guitar at all times.
Wrists
This can be a frequent area of injury and a persistent niggle if not managed correctly. Injuries typically occur on the fretting hand, the main culprits being Carpal Tunnel Syndrome and Tennis Elbow (covered below).
Keeping the elbow of your fretting hand low and close to your body will allow you to form chord shapes without excessive wrist flexion.
Although it may not be possible with every chord, try to position the thumb of your fretting hand in the mid line of the neck. This helps maintain a neutral wrist position and reduces unnecessary strain.
On your picking/strumming hand keep your forearm and wrist parallel to the body of the guitar. Again, the aim is to keep the wrist in a neutral, relaxed position.
Hands
Where the magic happens! It’s possible to write a whole article just on hand position. Andrew Wilson has created an excellent illustrated guide for this on another one of our articles titled “Guitar posture and Hand Position”. One thing to note; avoid pressing down more than necessary on the strings. Only use enough force to produce a clear sounding note. This will increase your playing time, as you wont fatigue as quickly and will reduce tension in your muscles and tendons.
Adopting the correct posture is an absolute priority for injury prevention. If you take one piece of advice from this article, let it be the significance of posture. With all the positions above, try to ensure your muscles are relaxed, rather than tensed up.
Warm Up / Cool Down
As a guitar player, you are just like any athlete. You must train your muscles to make specific and complex movements. When your muscles aren’t warmed up, you are more likely to develop micro tears that lead to injury. You also have a higher chance of making errors. Many guitarists advocate slowly playing through some simple scales and chording patterns to target specific motor units and prepare your nervous system for the session ahead. Warming the muscles and joints also increases your range of motion enabling you to stretch for the more complex chords. A cool down helps relieve that stiff, fatigued feeling in your muscles and joints. It also helps your body feel better in the hours and days following a long session. The stretching programme below can be used as a cool down.
Take Breaks
As with any physical activity, breaks are required to achieve optimal performance. With guitar, it is generally accepted that a 10 minute break every 45 minutes is sufficient. However, it’s not as simple as one size fits all. If you’re a beginner, you should err on the side of caution. After all, if you were new to running, you wouldn’t jump straight into 45 minute time trials! Take a five minute break every 25 minutes. Taking a break does not mean go make a coffee. Put down your guitar, get up, change position, do a quick stretch or two from the list below and your ready to go again. You may slowly increase your session duration as your tolerance and endurance improves.
Be Stress Aware
Studies have demonstrated a direct link between stress and repetitive strain injuries. According to the American Psychological Association (APA), when the body is stressed muscles tense up. It is important to be conscious of your stress levels to allow effective practice from both a physical and mental perspective. The APA recommends relaxation techniques and other stress-relieving activities to effectively reduce muscle tension. Many people find meditation helps, others prefer exercise. Whatever your method may be, use it to drop your stress before you pick up your guitar.
Common Injuries – Prevention & Treatment
If you’ve crossed that thin line between improper practice and injury, this section is here to help. First of all, your not alone. Musicians frequently get injured. In 2012 a study of musicians in Australia’s professional orchestras found that 84 percent of the study participants had experienced pain or injuries that interfered with playing.
Repetitive strain injuries (RSI’s) are the most commonly reported injuries for new and experienced guitarists. RSI’s occur through a combination of physical, chemical and emotional stressors. Physical, being the most common. This includes repeated movements and awkward postures, such as straining to hold a complex chord or hunching shoulders to peek at your fingerboard. Chemical stressors are the things your fueling your body with ie. foods and drinks, and emotional stressors involve your mental state before, during or after practice.
But how exactly can these unrelated factors all lead to an injury that can have you sidelined for weeks or even months. Take this more practical example;
You’re practicing before and after work to learn a new skill that for the past 40 years has never existed in your daily routine (physical stress) and your putting pressure on yourself to master those specific chords (emotional stress) but your muscle endurance hasn’t developed enough to continuously repeat the same three chords for Bob Dylan’s ‘Blowin in the wind’ (physical stress), so you make your 4th coffee of the day (chemical stress) and sit on your ikea stool you refuse to throw out despite the wobble (physical stress) and repeat it over and over again until your forearms are aching (physical stress) and your partner is shouting that dinner is ready (emotional stress). Get me now?
Your risk of developing a RSI is increased if you’re a middle aged adult (35-55 years old), smoker, overweight or have diabetes. Investing in prevention is the best way to ensure success. Many guitar players neglect to take action until the symptoms present themselves; but this may be too late and cause delays in your progression.
The most common RSI’s in guitar players include:
- Lateral Epicondylitis (Tennis elbow)
- Carpal Tunnel Syndrome
- Cubital Tunnel Syndrome
- Stenosing tenosynovitis (Trigger Finger)
We will delve deeper into each injury below and suggest ways you can attempt to manage or prevent them worsening. However, as mentioned above, this is not intended to substitute receiving professional medical advice. It is also important to note that none of the exercises below should cause pain or make your symptoms worse. Avoid completing them first thing in the morning, as soft tissues need time to warm up before stretching.
R.I.C.E.R
The most immediate action for all inflammatory conditions is to follow the R.I.C.E.R principal. It may also be worth paying your pharmacist a visit to see if they can advise on best pharmacological management.
R- Rest: The best way for the tendons to heal is by simply stopping the activity that is causing the pain. Were not talking drastic casting and slings, but yes, this means locking up the guitar for a period of time. Even with the slightest pain, rest is the most beneficial action.
I- Ice: Applying ice to the painful region for approximately 10-20 minutes a few times a day can help to reduce inflammation. Never apply ice directly to the skin, instead wrap it in a towel. Ice cubes in a ziplock bag, or the ancient bag of frozen peas work great to mould around bony prominences.
C-Compression: Compressing the area of inflammation with an elastic bandage, can help reduce swelling. Be sure to avoid a compression bandage that’s too tight. You should be able to comfortably fit two fingers between your skin and the bandage.
E- Elevation: Elevate the affected arm with pillows, or on a table while applying ice or resting. Keeping the inflamed area above your heart-level can help reduce the swelling.
R- Referral: If you’ve followed the above principles for 48-72 hours and you still experience pain, visit your appropriate healthcare provider. You should also seek medical attention if the pain is sharp, unrelenting or gets worse. Some studies have demonstrated the benefit of bracing/strapping for the conditions below, and your doctor of physiotherapist will be able to guide you towards the most beneficial treatment option.
Tennis Elbow
Lateral Epicondylitis, commonly termed ‘Tennis Elbow’, is a painful overuse condition of the muscles and tendons that attach into the bony prominence on the outer elbow (lateral epicondyle). It’s caused by repeated contractions of the forearm muscles that extend your hand and wrist, leading to overload. Despite the name, tennis elbow can be caused by any sport or action that produces repetitive stress on the tendons and muscles that extend the wrist and fingers.
When playing guitar, your fretting wrist and finger extensors are continually working to swiftly change chord shapes. If your strumming hand is not positioned correctly, you can also cause unnecessary stress on these extensors too. The main muscle in the forearm that falls victim to overuse, is the Extensor Carpi Radialis Brevis. Without enough endurance it can’t keep up with an increase in load. This leads to micro-tears in the tendon that attaches to lateral epicondyle of the elbow, resulting in pain and tenderness.
In guitar players, general forearm weakness, an increase in practice load and incorrect arm positioning are the primary precursors for lateral epicondylitis.
Being an overuse injury, tennis elbow rarely comes on overnight. It is important to know the early signs and symptoms before it’s too late. Some common symptoms of tennis elbow include:
- Pain and weakness when gripping an object or turning a doorknob
- Pain or burning that radiates from the outside of your elbow to your forearm or wrist
- Inflammation or tenderness on the bone on the outside of the elbow
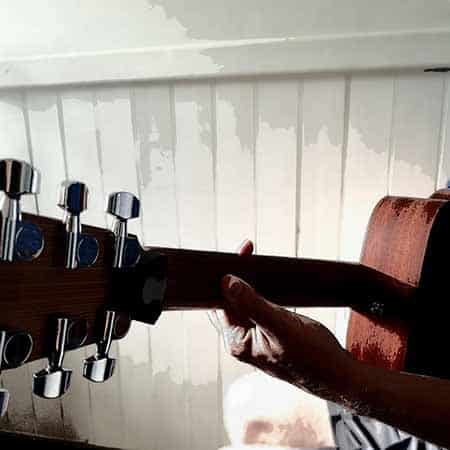
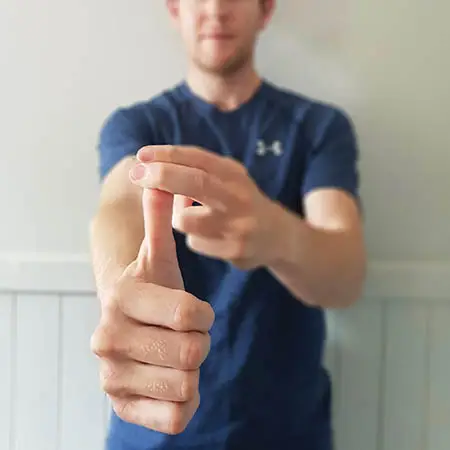
This can be prevented by ensuring correct arm, wrist and hand postures mentioned earlier, such as keeping your forearm and wrist parallel to the body of the guitar on your picking/strumming hand and keeping your fretting elbow close to your body, as imaged below.

It is important to remember to space out practice sessions and take regular breaks. A thorough and specific warm up can help prepare the muscles for activity. Stretching and strengthening muscles and tendons increases blood flow and lengthens the fibres, reducing symptoms of overuse. Following the stretches and exercises below can help you return to your best.
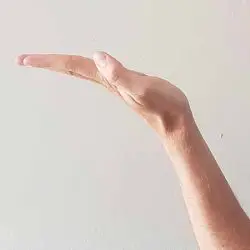
Wrist Extensor Stretch
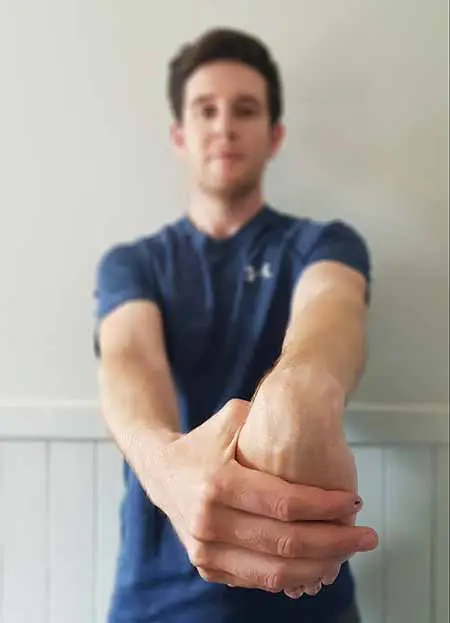
- Extend your arm in front of you with your palm facing down
- Point your fingers towards the ground
- Using your other hand, gently bend your wrist further to feel a moderate stretch in your forearm
- Hold for 20-30 sec. Repeat 2-4 times on both sides
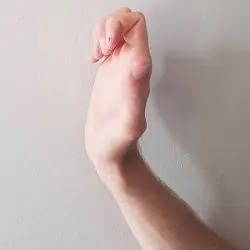
Wrist Flexor Stretch

- Extend your arm in front of you with your palm facing up
- Point your fingers towards the ground
- Using your other hand, gently bend your wrist further to feel a moderate stretch in your forearm
- Hold for 20-30 sec. Repeat 2-4 times on both sides
Eccentric Strengthening Exercise
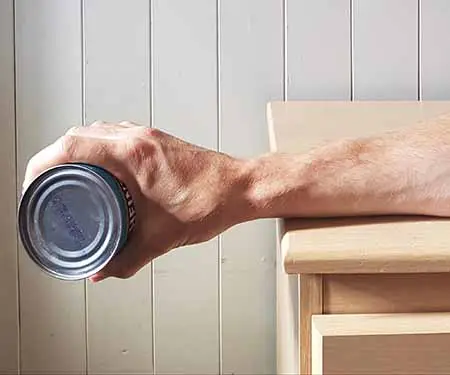


- Grab a 0.5kg dumbell or can of beans
- Position your arm so that your forearm is supported by a table and your wrist and hand are hanging off the edge
- Hold the dumbbell/can in your hand with your palm facing down
- Use your free hand to bend the wrist back, lifting the weight
- Slowly and gradually lower the wrist down with the weight in it
- Repeat 10-15 times on both arms
Repeat the above stretching exercises three times daily and the strengthening exercise once per day. Following the RICER principles and completing the above exercises may help aid symptoms but it wont prevent them from recurring. Once the pain has resolved, a gradual return to playing is advised adopting the preventative measures mentioned earlier.
Carpal Tunnel Syndrome
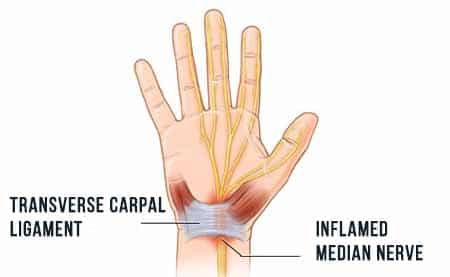
The Carpal Tunnel consists of the bones in our wrist and the ligaments that run across them. Tendons and nerves run through the tunnel to supply our fingers with sensation and movement. Carpal tunnel syndrome occurs when the median nerve is pinched within the tunnel. This may result from inflammation of the nerve or irritation caused by overuse.
Common symptoms of Carpal Tunnel Syndrome include:
- Tingling, burning or pain in the palm of the hand and fingers
- ‘Shaking out’ the hands temporarily reduces the pain
- Worsening of pain during the night
- Weaker grip
- Numbness in the palm of the hand
It is most common in the fretting hand due to a combination of a constant tight grip on the neck of the guitar and the repetitive motion of the fingers. This can cause tendon stress and lead to inflammation within the carpal tunnel. Along with the risk factors listed above, arthritis also increases your chances of developing the condition.
Symptoms can be reduced or prevented by focusing on correct arm positioning. Maintaining a neutral wrist position ensures maximum space within the carpal tunnel, allowing the nerves and tendons to move freely without being compressed or irritated. Ensuring a correct neck and back posture can also reduce overall tension on your nervous system.
Along with the RICER technique, performing the exercises below can help. They improve joint range of motion, encourage the median nerve to glide and can increase the space within the Carpal tunnel.
Wrist Flexor Stretch
- Extend your arm in front of you with your palm facing up
- Point your fingers towards the ground
- Using your other hand, gently bend your wrist further to feel a moderate stretch in your forearm
- Hold for 20-30 sec. Repeat 2-4 times on both sides
Wrist Extensor Stretch
- Extend your arm in front of you with your palm facing down
- Point your fingers towards the ground
- Using your other hand, gently bend your wrist further to feel a moderate stretch in your forearm
- Hold for 20-30 sec. Repeat 2-4 times on both sides
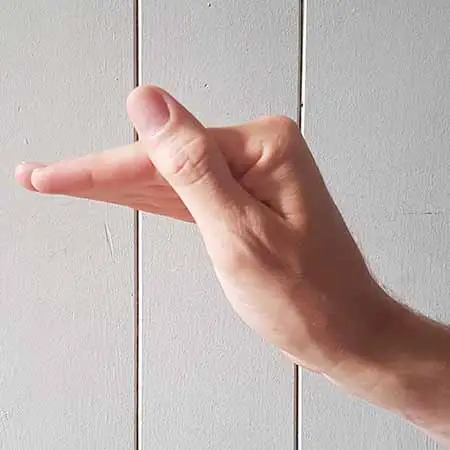
Median Nerve Glide


- Make a fist with your palm facing you and bend your elbow
- Straighten your fingers out to point up, keep the wrist neutral and thumb pointing up
- Bend your wrist back so your fingertips point away, whilst keeping your thumb close to your fingers
- Point your thumb out to the side
- Hold the hand position but turn your forearm away from you
- Use your other hand to gently pull your thumb down for a mild to moderate stretch.
- Repeat 10 times. 2-3 times per day
Tendon Glides


- Start with your elbow bent, wrist straight and fingers pointing straight to the ceiling
- Curl your fingers into a ‘hook’ position with knuckles pointing up
- Straighten your fingers to make a ‘L’ shape- make sure your thumb is relaxed
- Fold your fingers down to your fingertips touch our palm
- Curl into a regular fist
- Repeat 10 times. 2-3 times per day
Cubital Tunnel Syndrome
Cubital Tunnel Syndrome results from compression or stretching of the ulnar nerve. This nerve travels from the central nervous system in your neck, to the ring and pinky finger on your hand. It controls large muscles in the forearm that flex the wrist and small intrinsic muscles in the hand responsible for fine dexterous tasks, such as precisely pressing on a fretboard. It also provides sensation to the pinky finger and half of the ring finger.
Just below the elbow, the ulnar nerve passes through an anatomical tunnel, known as the cubital tunnel. It is bordered on both sides by bony structures of the elbow and on top by a tendinous arch joining the two heads of the flexor carpi ulnaris muscle. This muscle flexes the wrist and with overuse (typically on your fretting hand), the tendons can develop microtears and inflammation. This reduces the space within the cubital tunnel and results in the ulnar nerve becoming compressed.
Common symptoms include:
- Pain or altered sensation, such as “pins and needles” or numbness, in the ring and small finger. This is often worse when the elbow is bent.
- Weakness and/or poor coordination in the ring and little finger and reduced strength when bending your wrist.
- Decreased ability to pinch the thumb and little finger together.
In the early stages, you may only experience altered sensation. This is the time to act and prevent the condition worsening. If you experience any weakness or muscle wasting, pay your doctor or physiotherapist a visit.
Along with the RICER principles and exercises below, you should avoid any activities that require you to bend your elbow for long periods of time. Increase your break duration and frequency. Unfortunately, this definitely includes playing guitar. Also, avoid leaning on your elbow. For example, do not rest on your elbow when seated and avoid placing your arm on an open window when driving. Maintaining a straight elbow when sleeping can also reduce symptoms. A brace or splint can help here. Your pharmacist may also recommend anti inflammatory medication to reduce the swelling around the nerve.
Nerve Gliding Exercises
These exercises can help improve the flexibility of the ulnar nerve and encourage it to move freely through the cubital tunnel. Do not hold the positions for more than 3 seconds. You may feel a stretching sensation, but they should not cause pain.
Elbow flexion and wrist extension


- Sitting tall, with your head in a neutral position, reach the affected arm out to your side keeping it level with your shoulder, palm facing up.
- Bend your elbow to bring your hand towards your shoulder. Tilt your wrist back as you do this.
- Return to start position.
- Repeat slowly 5 times.
Head Tilt

- Same start position as above
- Tilt your head away from your hand until you feel a stretch.
- To increase the stretch, extend your fingers and wrist toward the floor.
- Return to starting position and repeat slowly 5 times.
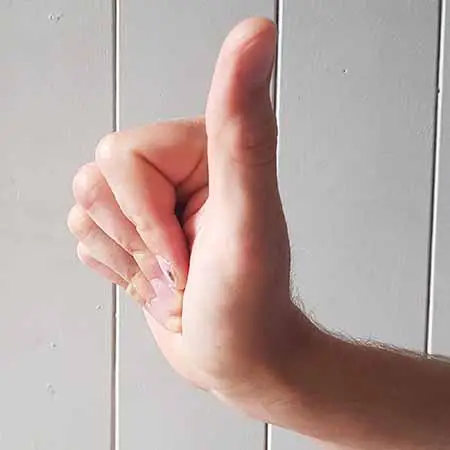
A-OK


- Same start position as above
- Touch your thumb to your first finger to make the “OK” sign.
- Bend your elbow and bring your hand toward your face, wrapping your fingers around your jaw, placing your “OK” sign over your eye.
- Hold for 3 seconds, then return to starting position and repeat 5 times.
Trigger Finger
Trigger finger, also termed ‘Stenosing Tenosynovitis’ is a condition that causes a finger or thumb to become locked in a bent position. It occurs when the sheath that surrounds the tendons in the hand, becomes inflamed.
Our hands have pulley-like tendons that extend from the muscles in our forearms, to the tips of our fingers (think strings on a puppet). These tendons give us the ability to freely extend and flex our fingers to successfully pick and fret a guitar. The tendons are held in position by a fibrous sheath called the retinaculum. With overuse, the retinaculum and tendons can become inflamed, narrowing the space and compressing the tendons.
The most common sign of trigger finger is the ‘catching’ of one or more fingers when trying to straighten them. This may be momentarily, or can require the individual to physically straighten the finger with the opposite hand. Trigger finger can affect a finger or a thumb, multiple fingers at a time, and even both hands.
Further symptoms include the following and present worse in the morning:
- Finger stiffness
- Popping sensation when straightening fingers
- A forming nodule at the base of the finger
Trigger finger is most likely to occur in a guitar player that grips the neck too tight and presses hard on the fingerboard. It can be difficult to maintain an effective grip and simultaneously hold a chord, without stressing the tendons, but correcting your positioning early on can dramatically reduce your chance of developing this condition. Limited range of motion and strength in the forearm/hand muscles is also a contributing factor.
Strengthening and stretching exercises help to keep the tendons warm, allow the tendons to move more freely and improve endurance in the hand and forearm muscles.
The exercises below can be used to both prevent and treat trigger finger.
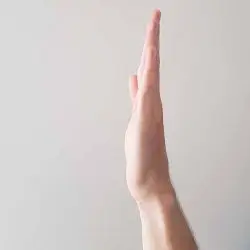
Finger Stretch

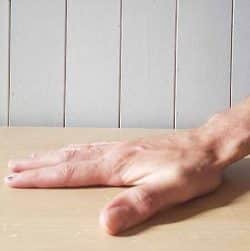
- Place your hand palm-down on a flat surface
- Gently push into the surface to straighten your fingers as flat as possible
- Hold for 30 seconds. Repeat 10 times on each hand.
Individual Finger Strength

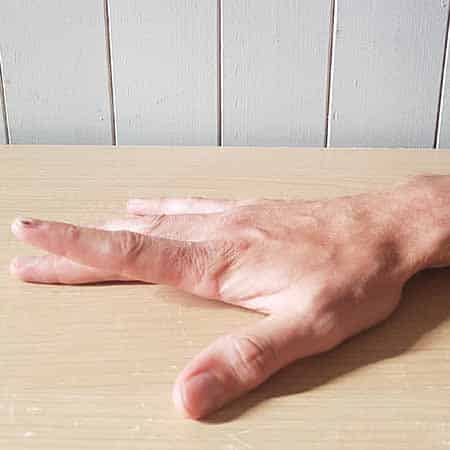
- Place your hand palm-down on a flat surface
- Lift one finger off the table, hold for 3 seconds, then lower
- Repeat 5 times on each finger. Repeat on opposite hand
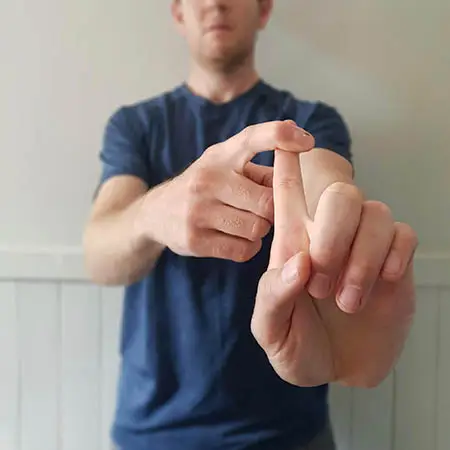
Multi-finger Strength

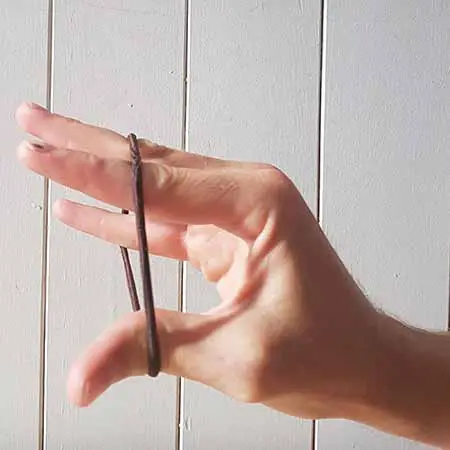
- Pinch your fingertips and thumb together
- Firmly place an elastic band (or hair elastic) over them
- Seperate your fingertips and thumb, by opening and closing the hand
- Repeat 15 times on each hand
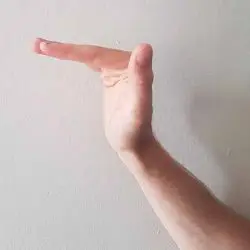
Tendon Gliding
This tendon glide can help align and lengthen the tendons under their sheath


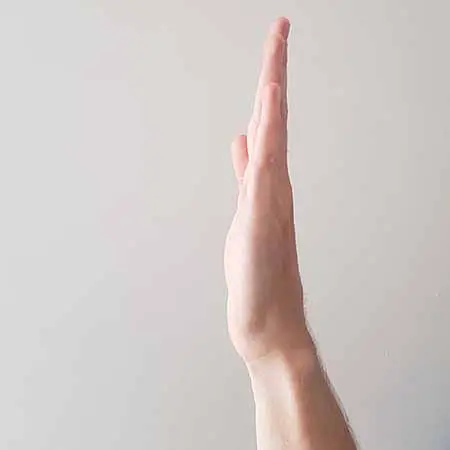


Hold your hand out flat in front of you, creating a ‘stop’ signal
- Gently bend the fingertips to touch the top of the palm
- Return hand to “stop” sign again
- Gently bend the fingers to create a tight fist with the thumb held in
- Keep the fingers straight this time but bend at the knuckles.
- Gently bend the fingers to create a tight fist, this time with the thumb stretched out
- Repeat 10 times on each hand
It is recommended to complete one week of the RICER principles before starting the above exercises. Time frames vary, but you should not return to guitar until you are completely pain free. If conservative management is not successful, you may be advised to undergo corticosteroid injection or surgery.
Proper Practice Pays Off!
It’s not difficult to recognise that all of the above conditions are the result of improper practice. Some people may have predisposing factors that make them more susceptible, but ultimately if you practice correctly, and look after your body, it is unlikely that you will develop the conditions above.
Key prevention techniques to remember:
- Always warm up
- Take regular, planned breaks during sessions
- Avoid sudden increases in practice hours
- Be aware of your posture and correct it as necessary
- Complete the stretching program below as a cool down after playing guitar or add it elsewhere into your daily routine
- Listen to your body- if its sore, let it rest!
Supplemental Therapy
While it’s important to focus on strengthening and stretching your muscles to improve recovery and prevent injury, it’s also largely beneficial to spare some thought on additional factors that may be playing a part, and natural therapies for recovery:
- Hydration: Every cell in the body heavily relies on water to transport important nutrients and proteins. It’s vital to keep well hydrated before, during and after practice sessions to ensure muscles are receiving the nutrients required to recover… and no, coffee doesn’t count!
- Inflammation: Avoiding foods high in sugar, trans-fats and excessive alcohol, can reduce overall inflammation and stimulate nutrient uptake for recovery. Additionally, there has been strong research to support the use of omega fatty acids (fish oil) and tumeric to reduce inflammation and support tissue recovery. These can be incorporated in to your diet through food, or via supplements. Your healthcare professional or pharmacist may be able to further advise you on these products.
- Recovery: The importance of correct physical and mental recovery cannot be stressed enough. This includes taking scheduled breaks during practice, rests between practice sessions and optimal sleep-patterns.
- Meditation: Meditation has been demonstrated to reduce stress-related inflammatory responses, increase sleep quality, and help to better handle pain. Try a simple meditation app to help guide you through some sequences before, or after practice.
Stretching Program Before Playing
Stretching falls under the category of both prevention and recovery. An increase in muscle length and range of motion can help align collagen fibres and aid micro-damages and excessive tension. However, like many therapies, its benefits don’t show after a single session. This is why we recommend a daily 5-10 minute stretching routine in order to prevent any potential injuries.
General guide to static stretching:
- Stretching isn’t supposed to be painful! When moving into a stretch, gently ease into it until you feel a moderate pull- this is you’re sweet spot.
- Don’t hold your breath- taking large breaths in and out can help you hold the stretch for longer
- Hold each stretch for 20-30 seconds
- Always complete a stretch on both sides
- Never bounce when performing a stretch- this can lead to tears in muscle fibres
Neck
Lateral Neck
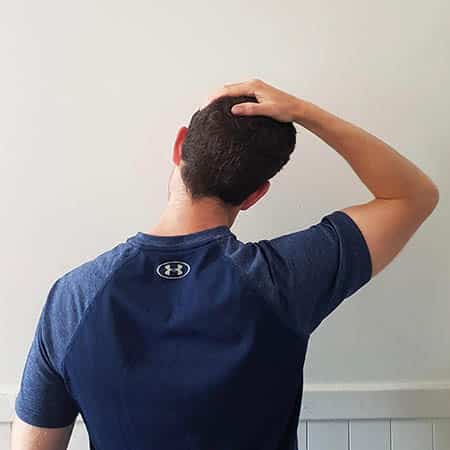
- Looking forward, gently tilt your ear towards your shoulder to feel a gentle pull at the side of the neck
- Be sure to keep your shoulders down
- This stretch can be progressed by gentle placing the same-side hand on top of your head and apply slight pressure
- Hold for 30 seconds. Repeat 3 times each side.
Shoulders
Posterior shoulder and upper trapezius.
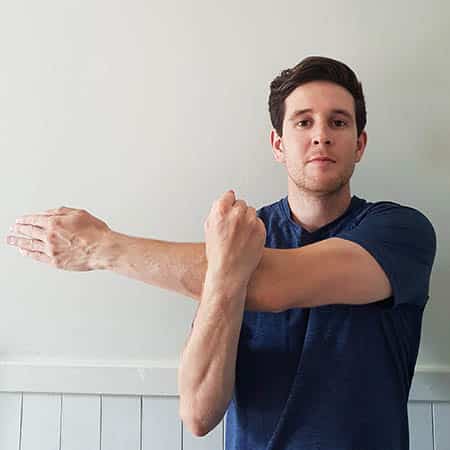
- Raise your right arm and bring it across to the left side
- Use your left forearm to hold the right arm tight towards your chest
- You should feel a stretch across the arm and the back of the shoulder
- Hold for 30 seconds.
- Repeat 3 times on each side.
Chest
Pectoralis minor

- Stand at the end of a wall or in a doorway
- Place the inside of the right arm on the door frame or wall at a 90 degree angle
- Gently push the chest forward until a moderate stretch is felt across the from of the shoulder
- Hold for 30 seconds.
- Repeat 2-3 times per arm
Pectoralis Major
- Reach both arm behind your lower back and interlace your fingers
- Take a breath in and straighten your arms down and away from your buttocks to feel a stretch across the front of the chest
- Hold for 30 seconds. Repeat 3 times.
Lower Back
Cat Cow

- Sit on the edge of a chair with your hips and knees at a 90 degree angle
- Slowly bend through the middle of your back, as though you have been punched in the stomach
- Arch the back and stick your chest out
- Repeat 10 times
Upper Back
Upper Trapezius
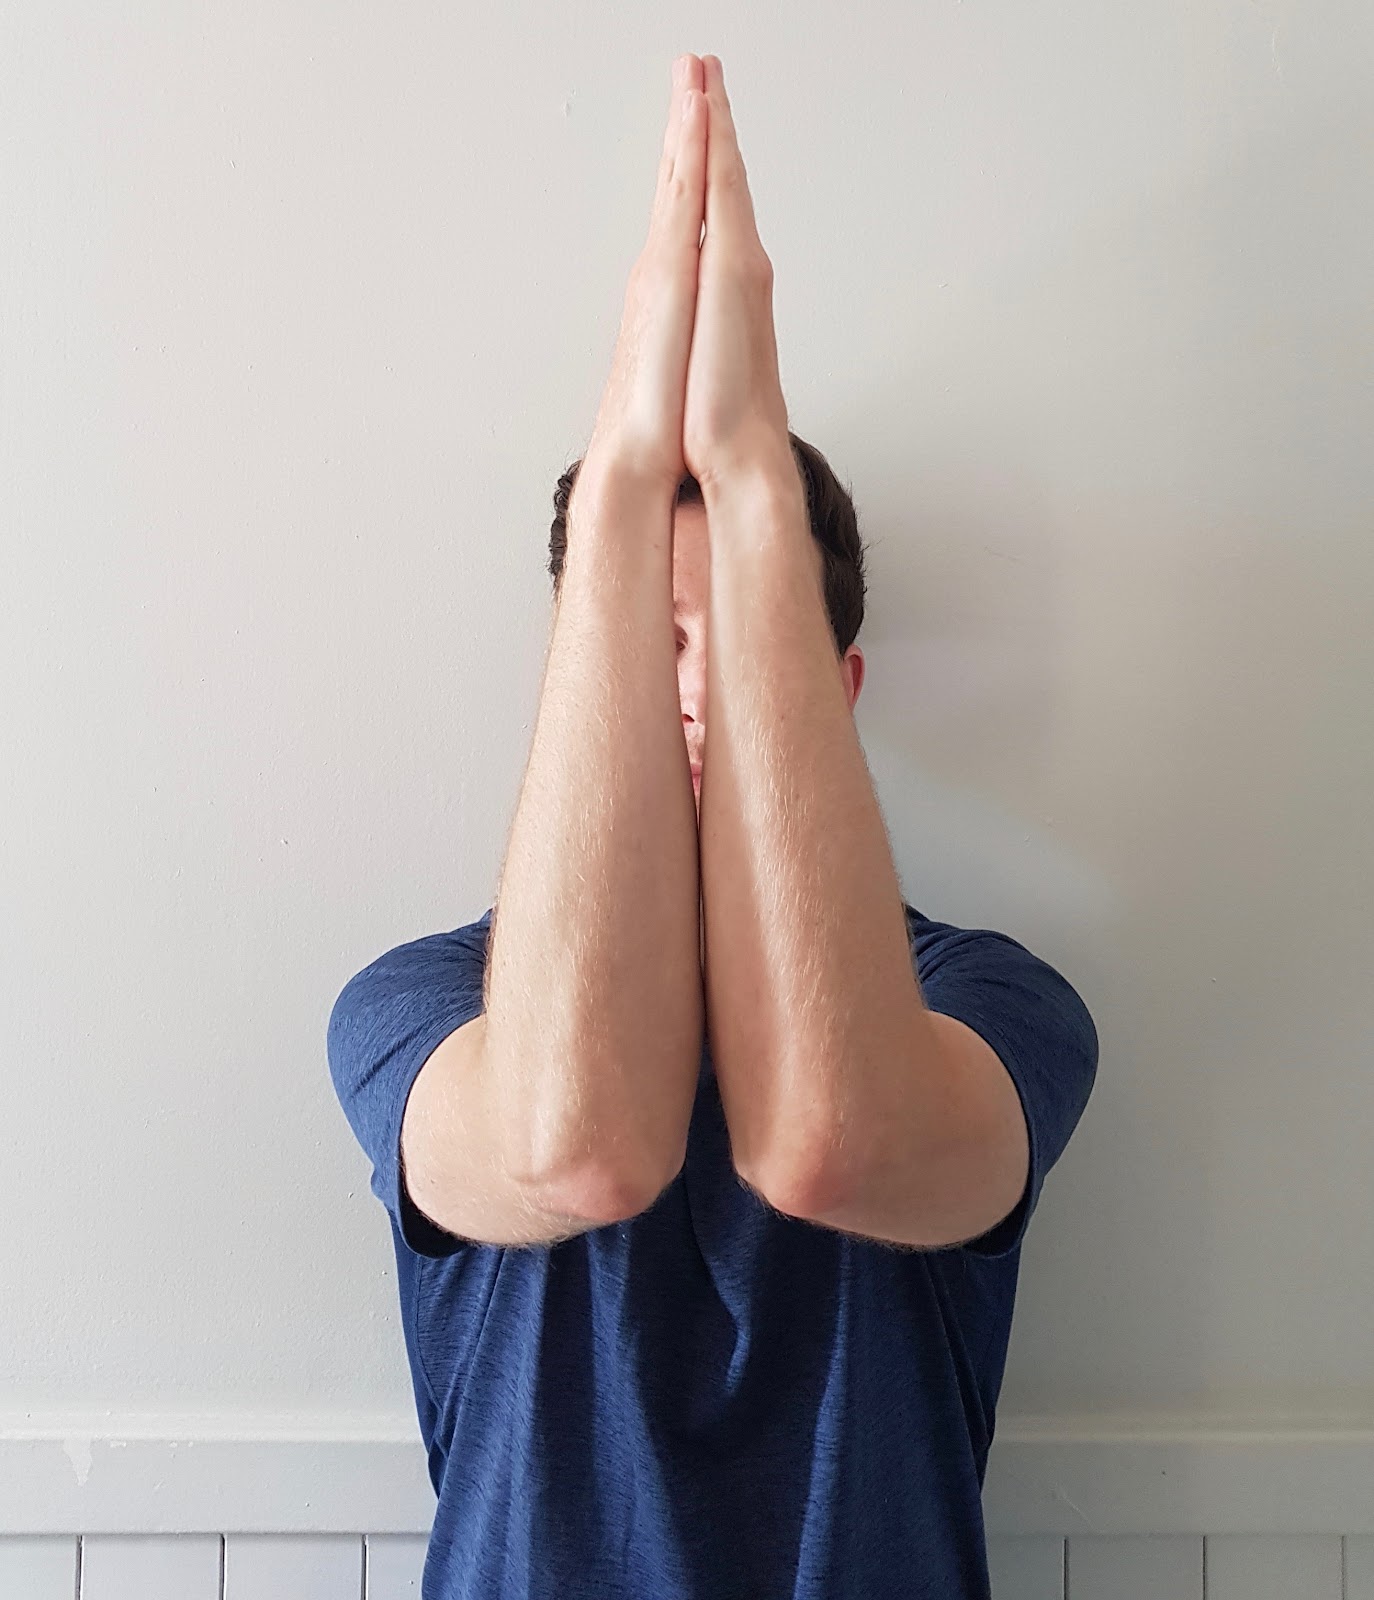
- Hold both arms in front of you at a 90 degree angle, with elbows touching and hands forming a ‘prayer’ sign
- Gently push the arms forward and up towards the ceiling to feel a stretch across the top of your back
- Hold for 5 seconds. Repeat 10 times.
Forearms / Wrists
Wrist Flexor Stretch
- Extend your arm in front of you with your palm facing up
- Point your fingers towards the ground
- Using your other hand, gently bend your wrist further to feel a moderate stretch in your forearm
- Hold for 20-30 sec. Repeat 2-4 times on both sides
Wrist Extensor Stretch
- Extend your arm in front of you with your palm facing down
- Point your fingers towards the ground
- Using your other hand, gently bend your wrist further to feel a moderate stretch in your forearm
- Hold for 20-30 sec. Repeat 2-4 times on both sides
Fingers
Individual Finger Stretch
- With your left hand in front of you, use your right hand to individually pull each finger back until you feel a gentle stretch
- Hold for 10 seconds and repeat 3 times on each finger, including the thumb
- Repeat on right hand
Conclusion
If your ethos of skill acquisition is based on a “no pain, no gain” model, you may need to revise it when learning guitar. I’m not referring to the almost unavoidable sore fingertips or fatigued forearms, I’m describing pain that prevents you from practicing and interferes with other activities of daily living. If you try to play through it, you’re not going to get very far and will eventually burn out. Think of driving your car with the handbrake on. Its simply senseless.
When you play through pain, you risk turning a minor, short-term issue into a much worse, long-term injury. At this point, it’s too late for preventative measures to help you and you should seek medical attention.